Unlocking Autodesk APS: Uploading Files & API Insights

My first experience using the Autodesk API for file upload was a process of entertainment and learning. The former is because I was discovering new concepts within the industry and the latter is because I was learning about the request structure and the flow of the uploading process.
If you are also starting to work with Autodesk APS, in this article I intend to give an overview and some considerations of what it takes to upload files as a project resource in Autodesk.
For practical purposes, the process related to authentication tokens will be excluded. In addition, the code examples are based on JavaScript (NodeJS).
What is Autodesk APS?
Autodesk APS is a cloud-based platform that empowers innovators to create custom software applications, harnessing the power of Autodesk’s vast portfolio.
It offers tools for design, engineering, visualization, and collaboration, seamlessly integrating with Autodesk’s suite of products. By using Forge, developers can automate design-to-manufacturing processes, visualize CAD data in 3D, and unlock new ways to collaborate in real-time. Its robust APIs and services drive the future of digital design and construction, bridging the gap between creativity and technology
Before We Begin
In our API, we can set up a constants file to define the routes that we’ll use to request resources. The other constants that contain more sensitive data (such as private keys, project IDs, or emails) should be set in a .env file or similar.
					const CONSTANTS = {
PROJECT_AND_HUB_URL: '<https://developer.api.autodesk.com/project/v1/hubs>',
STORE_LOCATION_URL: '<https://developer.api.autodesk.com/data/v1/projects>',
BUCKETS_URL: '<https://developer.api.autodesk.com/oss/v2/buckets>',
}

module.exports = CONSTANTS;
Also, if you have noticed, the data structure for the Autodesk APS requests often comprises an extensive amount of data, so you can also specify a file containing all these structures as functions, receiving the dynamic values as parameters.
Step 1. The Hub
This is the first and simplest of all steps, as it does not require any parameters other than the authentication token, but first of all… What is a hub? 🤔
I like to think of it as a repository where multiple projects associated with multiple users with different roles can be stored.

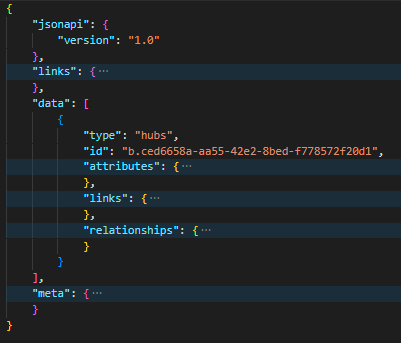
We can obtain a list of all the hubs associated with the account of the user requesting as follows:
GET <https://developer.api.autodesk.com/project/v1/hubs>
The response will be a JSON format with the keys: data, jsonapi, links, and meta. We are interested in getting the ID of our hub in the key data, which will be needed in the next steps.
Step 2. The Project
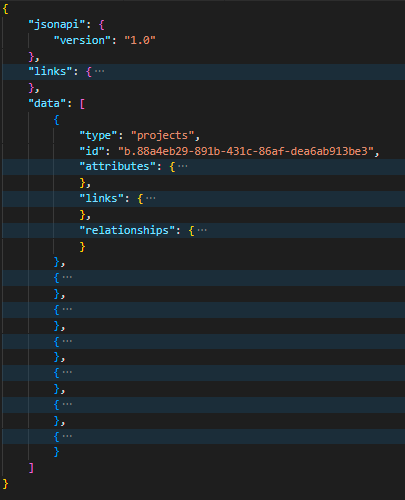
Once we have accessed our hub, we can select a project within that hub:
GET <https://developer.api.autodesk.com/project/v1/hubs/:hub_id/projects>
The response will be a JSON format with the keys: data, JSON API, and links.
So far, we have established which hub we want to access with the hub_id and which project we refer to with the project_id. However, what if we want to upload our files inside one of the nested folders within our project?
In this case, we may use the folder routes:
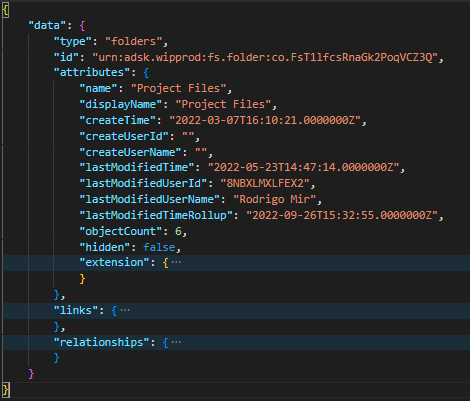
1. Getting the top folder: using the following endpoint, we can get the list of main folders of that project in that hub, considering (from our API) that we only want to return the ones inside “Project Files”.
GET <https://developer.api.autodesk.com/data/v1/projects/:project_id/folders/:folder_id/contents>
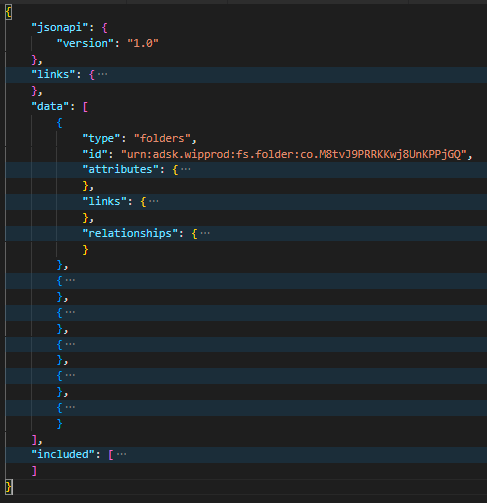
2. Getting the subfolder: using the following endpoint, we can get the folder where we want to upload the file.
GET https://developer.api.autodesk.com/data/v1/projects/:project_id/folders/:folder_id/contents
The list obtained can have several object types. However, we are interested in those of type “folders”. So the following parameter to consider is the folder_id where we want to upload the file.
Steps 3 and 4. Store Location and Signed S3 URL
Before creating the space and generating the signed S3 URL, we can check if the file is previously uploaded, considering the project_id and folder_id, **and thus send the item_id to indicate if, in the next step, we must update the version of the file or not.
In the example below, we can see how we’re requesting all the items in our project (the first command line) and then checking if that item name has been previously stored (the second command line).
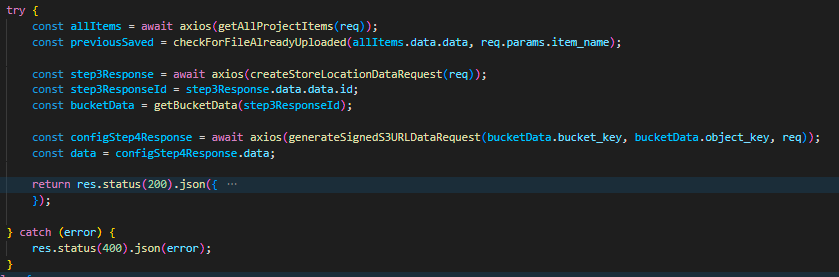
Then, we can create the Store Location making use of the project_id, item_name, and folder_id, as follows:
POST https://developer.api.autodesk.com/data/v1/projects/:project_id/storage

The response will be a JSON format with the keys: data and jsonapi. So after that, we must extract the bucket_key and the object_key using a function like the following one:
					function getBucketData(objectId){
    const file_location = objectId.split("urn:adsk.objects:os.object:").pop(1);
    const splited_bucket_details = file_location.split("/");
    return { bucket_key: splited_bucket_details[0], object_key: splited_bucket_details[1] };
}
Thus, the signed S3 URL can now be generated:
POST https://developer.api.autodesk.com/oss/v2/buckets/:bucket_key/objects/:object_key/signeds3upload
Step 5. Uploading the file
If we read the official documentation, the PUT method to upload the file to the signed URL can be done directly without the need for an authorization token. That is why, in particular, I perform this step directly from the frontend using the data obtained in the previous steps.
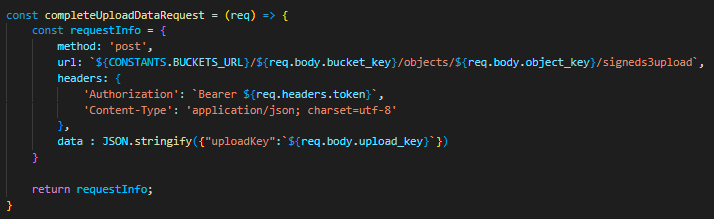
Step 6. Complete the upload
To complete the file upload, we must take into consideration the data previously obtained: bucket_key, object_key, and upload_key:
POST https://developer.api.autodesk.com/oss/v2/buckets/:bucket_key/objects/:object_key/signeds3upload
Step 7. Versioning
Finally, we can decide whether we want to create a first version of the file or simply update it, using the parameter previously stipulated in steps 3 and 4.
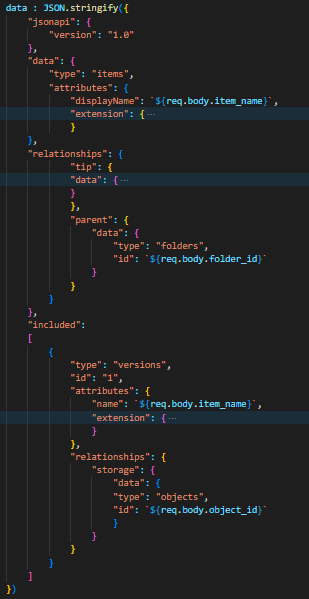
Creating a new version of the file
If it is the first version, the data structure will be as follows:
POST https://developer.api.autodesk.com/data/v1/projects/:project_id/items
Updating the version of the file
In case of an update, the data structure would be as follows:
POST https://developer.api.autodesk.com/data/v1/projects/:project_id/versions
Invitation
In my particular case, I had some problems understanding the Autodesk APS data requests, not only because each request is dependent on the previous one but also because the accessibility of the folders is established in another section of the documentation and it is important to use them during the file upload flow.
Finally, the file versioning management must be validated from our own API to be able to point it to the endpoint indicated in each case.
Have you also encountered these issues when uploading a file in Autodesk APS? What methods do you use to resolve them?
Resources
https://forge.autodesk.com/en/docs/data/v2/tutorials/upload-file/

Francisco Maranchello
A proactive entrepreneur at heart who constantly seeks new challenges. As an Architect who codes, I have broadened my skill set through a passion for technology and innovation. I believe technology is the future of architecture and the built world. Always learning and leveraging cutting-edge technologies to seek new answers, I bring a holistic approach when facing new challenges.