Create the infrastructure to auto-update an addin

Why do we need to have a feature to update our add-ins automatically?
Cloud-based and local installations are two primary methods for deploying our software. Cloud-based software updates automatically, allowing users to experience new features and sections seamlessly upon accessing the platform or website. On the other hand, local software typically notifies users when an update is available, prompting them to install it. This process is crucial to avoid the cumbersome task of manually downloading updates from the store, similar to updating apps on a phone. Although the Autodesk App Store does not mandate an auto-update feature, it is highly recommended that it be implemented for user convenience. This session will explore how to effectively integrate an auto-update feature into your software.

Understanding how the process will work
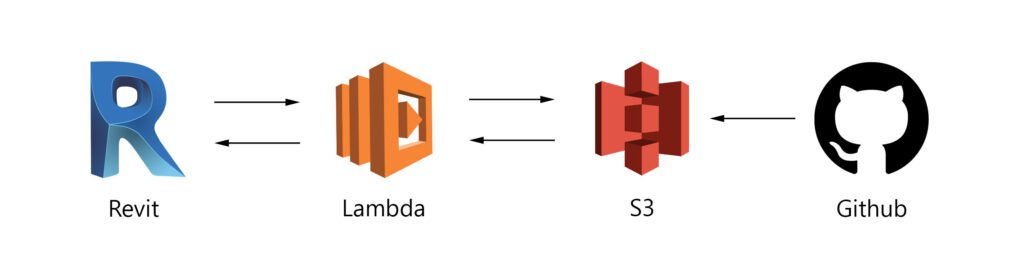
The process starts with Revit. Every time the user opens the program, the add-in will send the current Version and compare it with the latest one. If they match, nothing will happen. If they don’t, the user will get notified. If he accepts, an installer will be downloaded and run to update the app.
We will create an API using a Lambda with two endpoints: one that provides the latest Version and one that provides a signed URL to download the newest Version.
We will use S3 for storage, and GitHub Actions to automatically deploy to that folder every time the code gets updated.
Setting up Revit
First, subscribe to an event every time that Revit is opened; on the IExternalApplication, use the following code; note that we have added a disable of CS4014 (this warning is generated when you call an asynchronous method without awaiting its result ), typically Revit doesn’t like async calls unfortunately.
			 private bool versionAlreadyValidated = false;
       public Result OnStartup(UIControlledApplication application)
        {
            application.ViewActivated += Application_ViewActivated;
            return Result.Succeeded;
        }

				private void Application_ViewActivated(object sender, Autodesk.Revit.UI.Events.ViewActivatedEventArgs e)
        {
            #pragma warning disable CS4014
            if (!versionAlreadyValidated)
            {
                VersionValidate.Run();
                versionAlreadyValidated = !versionAlreadyValidated;
            }
            #pragma warning restore CS4014
        }
After this, it is necessary to validate the user has an internet connection; this can be done by checking an endpoint or opening the Google website.
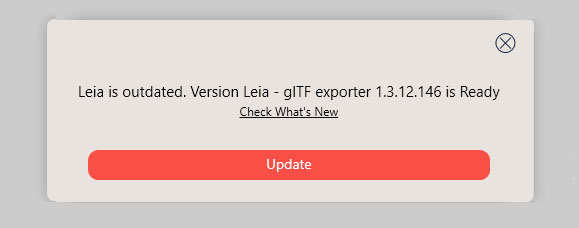
Then, we need to call our endpoint, send our current Version, and check if we have the most updated Version. If not, we will display a window to the user stating that the add-in needs to be updated.
If the user clicks download, we will create a directory in the temp folder to save the add-in and then download it.
namespace Common_glTF_Exporter.Version
{
    public static class DownloadFile
    {
        public static async Task FromServer(string pathFile, string installerName)
        {
            HttpClient client = new HttpClient();
            client.BaseAddress = new Uri("YourEndpoint");

            HttpResponseMessage result = client.GetAsync(urlParameters, HttpCompletionOption.ResponseHeadersRead).Result;
            HttpContent content = result.Content;
            string myContent =  await content.ReadAsStringAsync();

            string fileLocation = System.IO.Path.Combine(pathFile, installerName);

            await DownloadFileAsync(myContent, fileLocation);
        }

        static async Task DownloadFileAsync(string url, string filePath)
        {
            using (HttpClient client = new HttpClient())
            {
                HttpResponseMessage response = await client.GetAsync(url);
                if (response.IsSuccessStatusCode)
                {
                    using (FileStream fileStream = new FileStream(filePath, FileMode.Create, FileAccess.Write, FileShare.None))
                    {
                        await response.Content.CopyToAsync(fileStream);
                    }
                }
                else
                {
                    System.Windows.MessageBox.Show("Title", $"Failed to download file. Status code: {response.StatusCode}");
                }
            }
        }
    }
}
Then, to finalize, we will run the file.
Here are a few considerations that you need to take into account when building your installer:
- The installer should be able to check if Revit is running and using the add-in file and prompt the user to close Revit before the installer continues
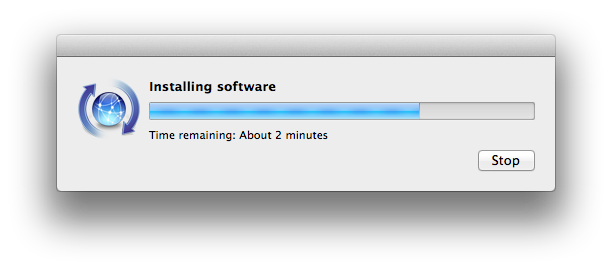
- A good practice is adding a Loading bar so the user knows the current progress when the file is downloaded.
- You can install an add-in in multiple places. I recommend using
%programdata%/Autodesk/ApplicationPlugins/NameOfYourAddinbecause this is the same place where the Autodesk App Store installs add-ins. You can easily overwrite it, and it also makes the add-in available for all the users on the computer. - Ensure your installer allows you to replace the add-in with the new Version without uninstalling the old one.
Setting up the Lambda API endpoints
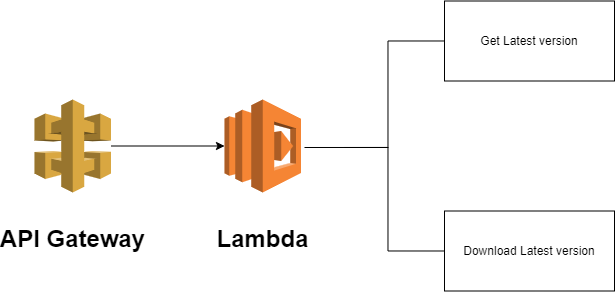
We have already explained how to create a Lambda and assemble a repo with all the detailed code here. This code is ready to be deployed in your AWS infrastructure; just add an aws-lambda-tools-defaults.json with your credentials in the project’s main folder.
You will only need to connect it to an APIGateway to use the Get and download latest versions endpoints:
Configure S3
We won’t cover creating an S3 bucket in this article, as we’ve already addressed it before. The key difference here is that the bucket will be private and accessed using an ID and Secret Key, unlike the previous method.
To obtain an AWS Access Key ID and Secret Access Key with permissions limited to reading and writing to a specific S3 bucket for use in a GitHub Action, you can follow these steps:
- Create a New IAM User:
- Go to the AWS Management Console and navigate to the IAM (Identity and Access Management) service.
- Click “Users” in the left-hand menu, then click the “Add user” button.
- Enter a username (e.g.,
github-action-user) and select “Programmatic access” as the access type. Then click “Next: Permissions.”
- Attach a Policy with Specific Bucket Permissions:
- Click on “Attach existing policies directly”.
- Click on “Create policy” to open a new tab.
- In the JSON tab, enter a policy granting read and write access to your bucket. For example:
					{
  "Version": "2012-10-17",
  "Statement": [
    {
      "Effect": "Allow",
      "Action": ["s3:PutObject", "s3:GetObject", "s3:ListBucket"],
      "Resource": [
        "arn:aws:s3:::your-bucket-name",
        "arn:aws:s3:::your-bucket-name/*"
      ]
    }
  ]
}
- Click “Review policy”, give it a name (e.g.,
GithubActionS3Access), and create the policy. - Replace
your-bucket-namewith the name of your S3 bucket. - Return to the tab with your new user, refresh the policies list, and attach the policy you created.
- Click “Review policy”, give it a name (e.g.,
- Create the User and Obtain the Keys:
- Click “Next: Tags” (optional tags can be added), then “Next: Review”, and finally “Create user”.
- The Access Key ID and Secret Access Key will appear on the success page. Download the CSV or copy these keys to use in your GitHub Action.
This might seem like a lot of steps, but it is essential to do this to ensure that if someone gets the pass, they can only do a slight damage. Never ever use an admin pass for this purpose.
Configuring GitHub Actions
As we have seen, GitHub actions are a great CI/CD tool as they are a simple way to automate your pipelines.
For this add-in, you need a pipeline with the following steps:
- Create a unique version string that increases every time you run the action so you can know the latest Version. This mike looks a little long, but I want to ensure that we always keep a format like x.x.x with just three single digits; this will allow us to easily compare add-in versions by removing the dots and checking which is the highest number.
					    - name: Determine Version
      uses: gittools/actions/gitversion/execute@v0.9.7
      with:
        useConfigFile: true
        configFilePath: GitVersion.yml
      id: gitversion

    - name: Calculate Version
      run: |
        $currentVersion = "${{ steps.gitversion.outputs.Major }}.${{ steps.gitversion.outputs.Minor }}.${{ steps.gitversion.outputs.Patch }}"
        $runNumber = ${{ github.run_number }}
        $versionArray = $currentVersion.Split('.')
        $buildNumber = [int]$versionArray[2] * 10 + $runNumber
        $newPatch = $buildNumber % 10
        $newMinor = [int]$versionArray[1] + [Math]::Floor($buildNumber / 10) % 10
        $newMajor = [int]$versionArray[0] + [Math]::Floor($newMinor / 10)
        $newMinor = $newMinor % 10
        $newVersion = "$newMajor.$newMinor.$newPatch"
        echo "FULL_VERSION=$newVersion" | Out-File -FilePath $Env:GITHUB_ENV -Encoding utf8 -Append
      shell: pwsh
2. Build the project
					- name: Build and Publish App
		run: msbuild yourProjectName.sln /t:Clean,Build /p:platform="Any CPU" /p:Confguration=Release /p:DeployOnBuild=true /p:PublishProfile=FolderProfile
3. Optionally, sign the dll with an SSL certificate.
4. Upload the .msi file to S3. To avoid exposing them in the code, configure the AWS ID and Secret as Github secrets.
					- name: Build and Publish App    - name: Configure AWS credentials
      uses: aws-actions/configure-aws-credentials@v1
      with:
        aws-access-key-id: ${{ secrets.EVERSE_AWS_S3_BUCKET_SECRET_KEY_ID }}
        aws-secret-access-key: ${{ secrets.EVERSE_AWS_S3_BUCKET_SECRET_KEY_SECRET }}
        aws-region: yourRegion

    - name: Upload file to S3
      run: |
        aws s3 cp ".\your\file.msi" "s3://your/bucket/location/"
Put everything together
Bringing all the pieces together in this process involves seamless integration of various components to ensure an efficient and automatic update mechanism for your Revit add-in, which I can guarantee involves much testing. Ultimately, it would be best to create the Revit add-in to check for updates every time Revit is opened by subscribing to an event and comparing the current add-in version with the latest available version.
This system’s backend relies on an AWS Lambda API that handles version checks and downloads updates. Updated files are stored in an S3 bucket, with deployment automated using GitHub Actions, which also manages versioning and builds the installer package.
Finally, the installer is designed to handle the update process smoothly, checking for Revit usage, guiding the user through the installation, and ensuring that the add-in is updated without requiring manual intervention. Combining all these pieces creates a streamlined and user-friendly update process that keeps your add-in up-to-date with minimal effort from the user’s side.
If you want an example of an add-in with this process implemented, you can check our Revit’s glTF exporter repo.

A daunting but rewarding path
While setting up an automatic update feature for your Revit add-in might initially seem daunting, it is an investment that pays dividends in terms of user experience, efficiency, and security. By streamlining the update process, you will not only enhance the usability of your software, making it more appealing to your users, but you will also ensure that they are always working with the latest features and security patches. This proactive approach to software development keeps your product competitive and minimizes the risks associated with outdated software. Ultimately, the effort put into automating updates is a small price to pay for the significant benefits it brings to both the users and the development team.

Valentin Noves
I'm a versatile leader with broad exposure to projects and procedures and an in-depth understanding of technology services/product development. I have a tremendous passion for working in teams driven to provide remarkable software development services that disrupt the status quo. I am a creative problem solver who is equally comfortable rolling up my sleeves or leading teams with a make-it-happen attitude.