How to convert Revit files to SVF without an APS account

Intro
Every time you try to turn a Revit file into the dazzling SVF (APS format), you’re faced with two, let’s say, “less-than-ideal” choices: either cozy up with a BIM360/ACC account or tango with the Model Derivative API. In both scenarios, you’re essentially sharing your data with Autodesk.
But hold onto your keyboards, fellow code warriors, because the game is about to change! We’ve cracked the code on how to build your very own, top-secret (not really), super-cool service to convert Revit files into SVF – no Autodesk strings attached!
Want to dive into this pool of independence? Keep reading, and let’s embark on this hilarious journey of liberation!

What is a Revit file?
A Revit file is a proprietary file format used in Autodesk’s Building Information Modeling (BIM) software, Revit. It serves as a container for architectural, structural, and MEP (mechanical, electrical, and plumbing) data, encompassing 3D models, annotations, schedules, and other project-related information. These files enable collaborative design and documentation of building projects, facilitating coordination among various disciplines involved in construction. With its parametric modeling capabilities, Revit files offer flexibility and efficiency in designing, analyzing, and visualizing building designs throughout the project lifecycle.
Make sure you have the right materials
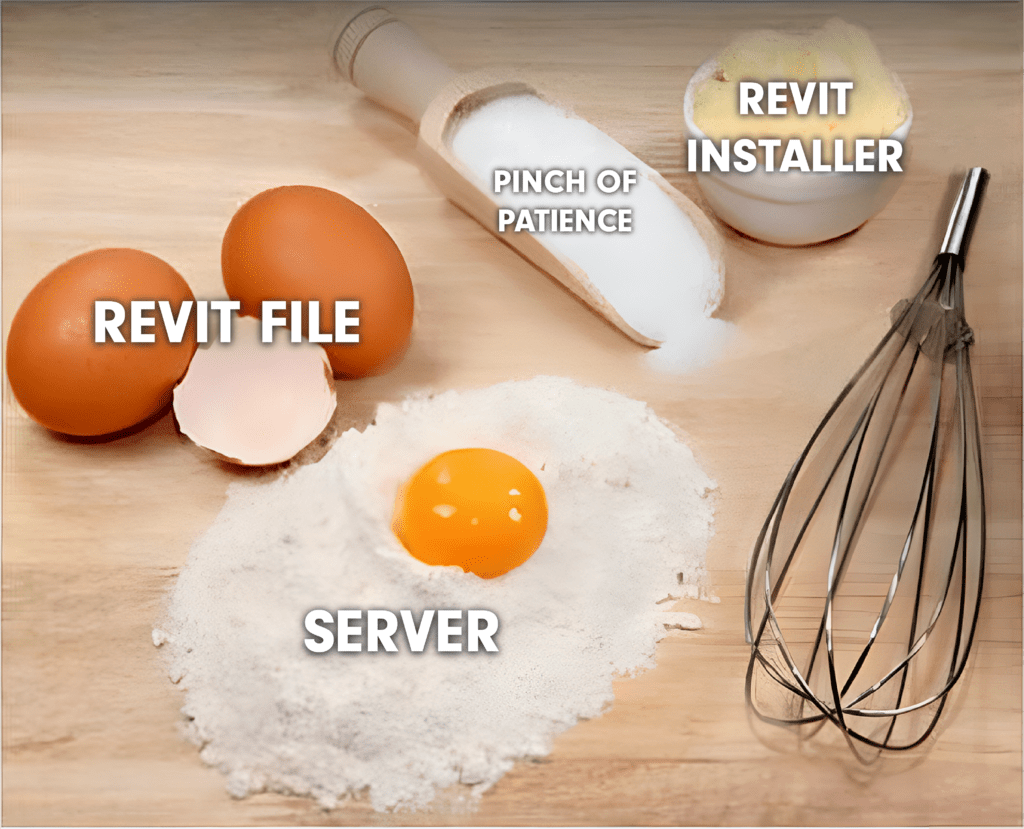
Creating your own service is not a complex process, but for today’s recipe, we are going to need the following ingredients:
- A server to install Revit and deploy your endpoint. We will be using EC2 from AWS
- A Revit file for testing purposes
- A Revit Installer
- Pinch of patience
How does the process work?
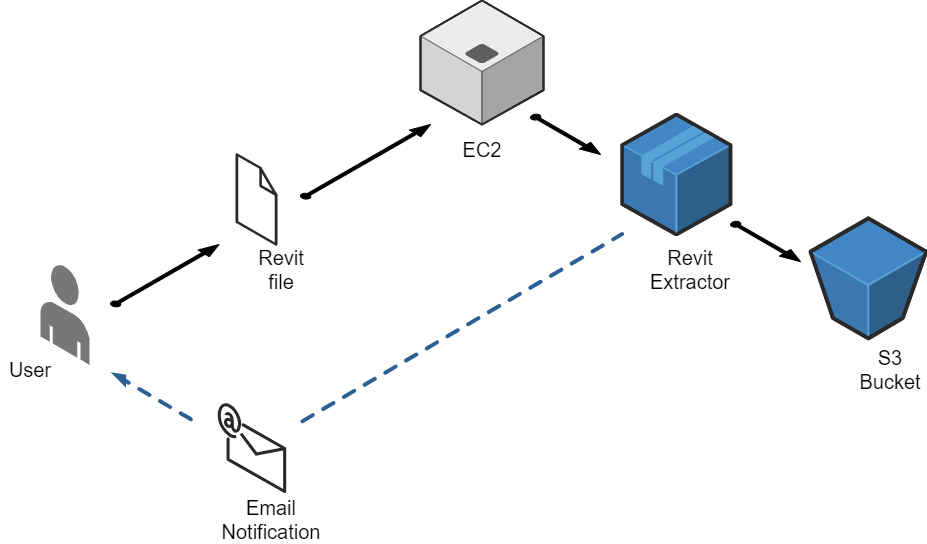
Now that we have all the ingredients, let’s understand how the process is going to work,. The user will upload a Revit file to the EC2. Then a .net application will use Revit Extractor to process the file from .rvt to .svf. But hold on your horses, what on earth is a Revit Extractor?

Well, Revit Extractor is a marvelous tool provided by Autodesk that is installed in your computer along with Revit and typically found here:
C:\\Program Files\\Autodesk\\Revit 20XX\\RevitExtractor.exe
You can use this tool with a command line to convert .rvt files into .svf locally, be aware that this tool will not work if you don’t have Revit Installed. The good news is that you don’t need to be logged into Revit or even have it open to use it. You just need to have it installed on your computer.
Now back to the process, so after the .svf files are created, they will be sent to an S3 bucket to be stored, and finally, the application will notify the user that the file is ready to download
I know the process might sound complex, but trust me, we have developed all the different pieces for you, so let’s get started.
1. Set Up an EC2 Instance with Windows
We are not going to dive deep into how to do this. We have put together a great article about How to create a testing environment for Revit, where we explained how to create an instance manually, and we even provided ways to automate the process with Terraform and WPF.
For those who already know how to do it and don’t want to check our article (Party poopers), the only important aspects are:
OS: Windows server
Instance Type: T3.Xlarge
Disc Size: 100GB
Allow connection through RDP: Yes

2. Setting up your EC2
First, you have access to your EC2 instance you have to install Revit, for this tutorial we are using Revit 2023. You can either access the Autodesk website to download it or install it automatically with the following power shell script:
Invoke-WebRequest -Uri "https://s3.amazonaws.com/www.everse.co/Revit2024.exe" -OutFile "Revit2024.exe"; Start-Process "./Revit2024.exe" -ArgumentList "-q"
Secondly, you have to install IIS (Internet Information Services), an extensible web server created by Microsoft for use with Windows that will allow us to expose an endpoint from our server.
To do this, follow these instructions:
- Open Server Manager: open the ‘Server Manager’ dashboard. This is generally accessible from the start menu or taskbar.
- Add Roles and Features: In the Server Manager dashboard, find and click on the ‘Add Roles and Features’ option. This starts the Add Roles and Features Wizard.
- Role-Based or Feature-Based Installation: Choose ‘Role-based or feature-based installation’ and click ‘Next’.
- Select the Server: Choose the server on which you want to install IIS (in this case, it should be your current EC2 instance).
- Select Server Roles:
- In the ‘Roles’ section, scroll down and check the box for ‘Web Server (IIS)’.
- A window may pop up to add features that are required for IIS. Click ‘Add Features’.
- Select Features: Skip the features section
- Web Server Role (IIS): Just click ‘Next’ and ‘Install”
- Verify IIS Installation: To verify that IIS is installed, you can open a web browser and type the public DNS/IP address of your EC2 instance. You should see the default IIS welcome page.

3. Configure AWS S3 Bucket
We are going to use a simple S3 storage to save the processed files. For that purpose, follow the next steps:
- Create a New Bucket:
- On the S3 section in AWS, click on the “Create bucket” button.
- Select the AWS Region where you want to create your bucket.
- Provide a unique name for your bucket.
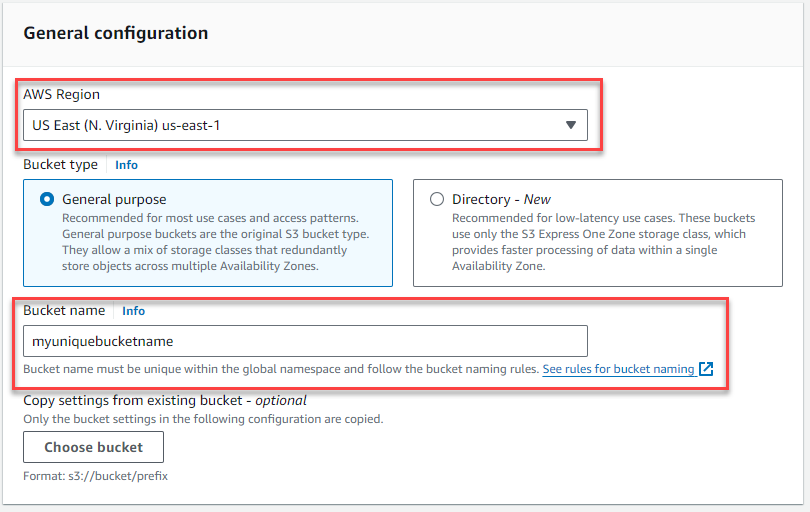
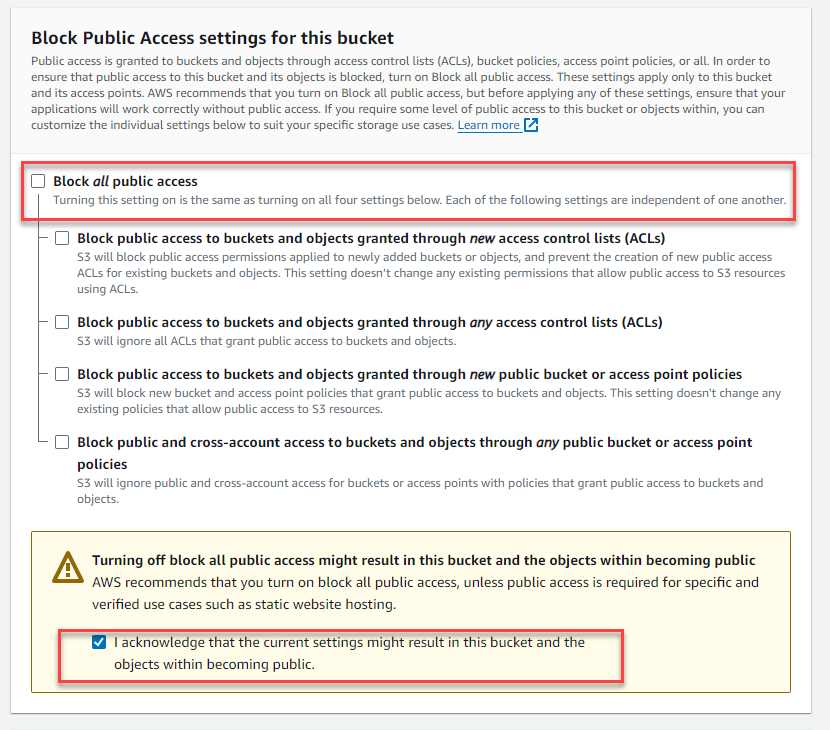
- Leave the ‘Block all public access’ option unchecked. This is crucial for making the bucket public.
- Click ‘Create bucket’.
- Modify Bucket Policy:
- Access the bucket
- Go to the ‘Permissions’ tab.
- Scroll down to the ‘Bucket policy’ section.
- Click on ‘Edit’.
- You can add a policy that grants public read access to the bucket. For example:
					{
  "Version": "2012-10-17",
  "Statement": [
    {
      "Effect": "Allow",
      "Principal": "*",
      "Action": "s3:GetObject",
      "Resource": "arn:aws:s3:::[BUCKET-NAME]/*"
    }
  ]
}
- Replace [BUCKET-NAME] with the name of your bucket.
Be cautious with this setting, especially if you’re storing sensitive data, this is just for testing purposes. If you are planning on using this in production, make sure you have a secure access.
4. Develop and Deploy the Application
Good news it you don’t have to develop anything, we have coded a .Net API that receives the revit file, transforms it to SVF, sends the file to S3 and finally notifies the user.
Use our Design Automation On-Prem EC2 Repo to deploy the app.
Deployment of a .NET Core API is a process that takes a couple of steps like installing IIS and Microsoft Web Deploy, publishing the app from Visual Studio, configuring the maximum size of files to accept large Revit files. To learn how to do all these, you can check this video.
5. Testing time
We can use Postman for this purpose. You just need to obtain the IP of your EC2 or the Domain if you configured one and the location of your Revit file in your computer
					curl --location 'http://<YourEc2IpOrDomain>/FileUpload/UploadFile' \
--form 'file=<Location of your rvt file>'
After importing the command to Postman and clicking run, you should get a response like this:“File <your file name>.rvt has been uploaded successfully.” wait a couple of minutes, and you should be able to see a .zip file in your S3 bucket. After that, a notification in your email.
Congrats! You have created an SVF file on your own.

6. Check if our model works with the APS viewer
For this, I tested the SVF in a local environment using a basic node js server
					const express = require('express');
const cors = require('cors');
const path = require('path');

const app = express();

// Enable CORS for all routes
app.use(cors());

// Serve files from a specific folder
const staticFilePath = path.join(__dirname, 'public'); // Replace 'public' with the name of your folder
app.use(express.static(staticFilePath));

// Start the server
const port = 3000; // You can use any port number
app.listen(port, () => {
    console.log(`Server is running at http://localhost:${port}`);
});
If you try to access a local file directly, you will get a CORS error, so using a server, above is a workaround. Make sure, for testing purposes, to locate your .svf file inside the “public” folder.
The next step is creating an HTML file with the javascript offline sample provided by Autodesk.
'document' : '[<http://localhost:3000/The/Location/>](<http://localhost:3000/svffile/Resource/3D>)Of/The/SVF/file.svf'
Finally, you should be able to visualize your local file like this:
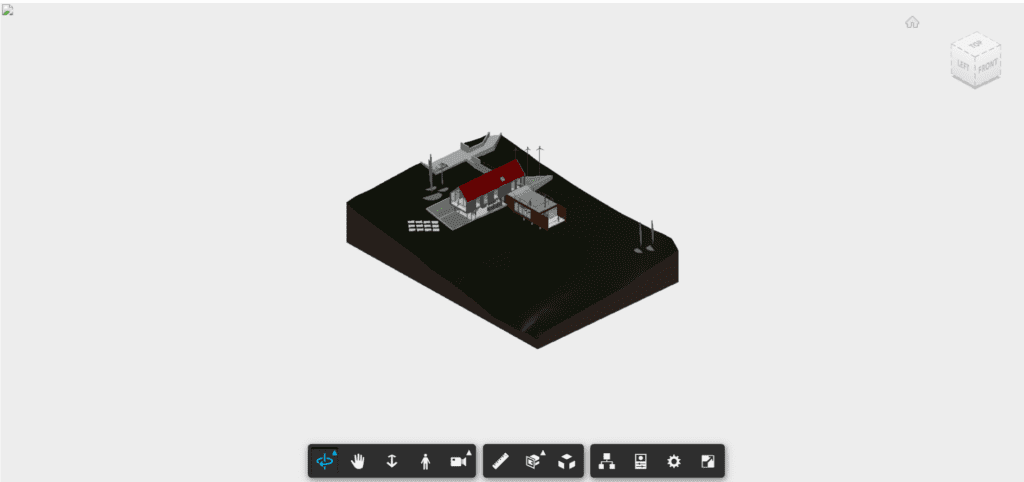
Be aware that this process allows you to create and visualize SVF files, not SVF2 files.
Conclusion
We hope this tutorial was useful and that it provides a solution for those who want to handle their own data or have a requirement for handle this on-prem.
This is a series of blogposts. In the future we will be showing how to handle more services on your server like Model Derivative API or APS viewer, so stay tuned if you are interested.

Valentin Noves
I'm a versatile leader with broad exposure to projects and procedures and an in-depth understanding of technology services/product development. I have a tremendous passion for working in teams driven to provide remarkable software development services that disrupt the status quo. I am a creative problem solver who is equally comfortable rolling up my sleeves or leading teams with a make-it-happen attitude.