How to work with Materials in the Revit API
Every Revit user works with materials since every Revit family includes one by default.
Many users even create their own materials, and while the process isn’t always intuitive, it’s generally manageable.
However, only a few developers dive into materials through the Revit API.
When I did, I was surprised to find how little documentation exists, especially around handling textures, bitmaps, scaling, offsets, UVs, and more.
This post condenses everything you need to understand the intricacies of Revit’s material system, so you don’t have to figure it out the hard way.
For this tutorial, we’ll be working with the Revit Sample House, which includes a great variety of material types to explore.

1. Getting the Material(s) of an Element
Every element has at least a material, but many objects might contain more than one material so you can check all the different ways to obtain materials:
| Level | API Path | When it Applies |
|---|---|---|
| Element Level | Element.GetMaterialIds() | Obtain a list of all materials present in an element. |
| Geometry‐level | GeometryElement.MaterialElement | Get a Material of the element |
| Face‐level | face.MaterialElementId | Get the material implemented on each face like for example the walls |
Some elements, like family instances, may have a single material applied to the entire geometry. However, others—such as walls—can have different materials assigned to each face.
Therefore, if you want to accurately extract all materials, it’s essential to iterate over each face and retrieve the material assigned to it individually.

Example of Revit wall with multiple materials
2. Extracting the Base (Diffuse) Color
If you select a Shaded view you will see the shading color of each material that has no relationship to it’s texture.
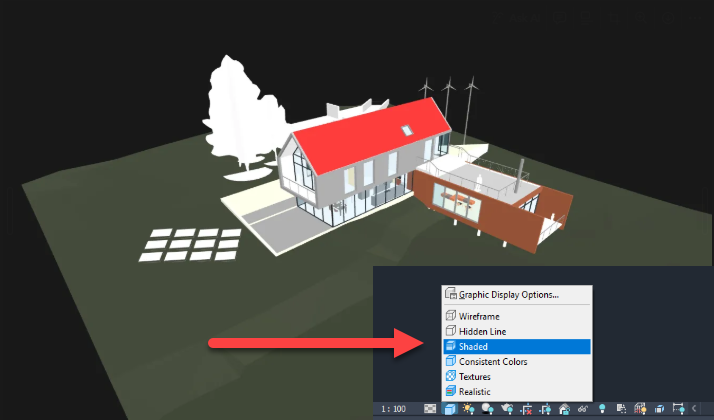
To obtain the shader color of each material you can do the following:
					csharp
CopyEdit
var rgb = mat.Color;  // Autodesk.Revit.DB.Color
byte r = rgb.Red, g = rgb.Green, b = rgb.Blue;
To check in the model the color you have to select it and then go to graphics:
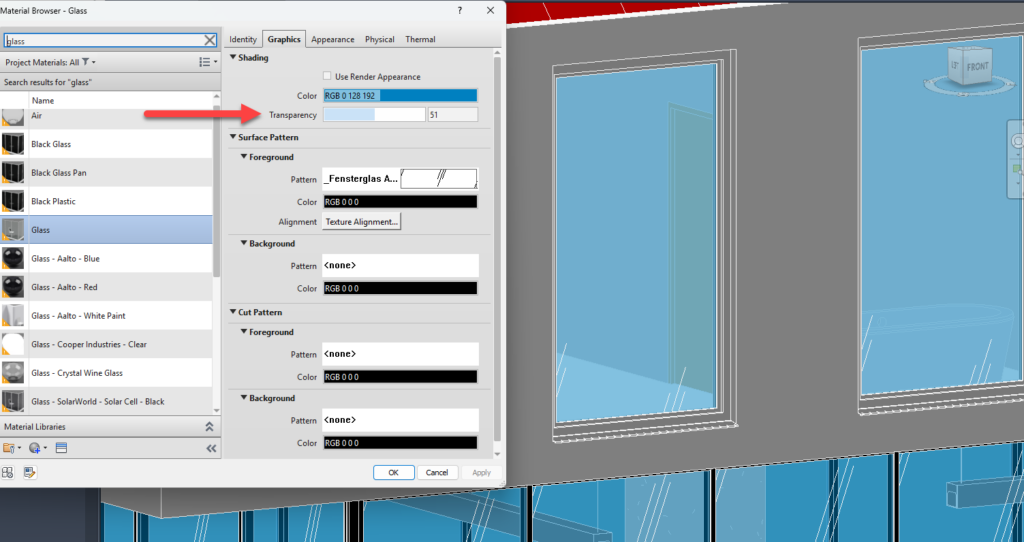
3. Reading Transparency / Opacity
Transparency is set on the Materials dialog’s Graphics tab. It goes from 0 (Completely opaque) to 100 (Completely transparent) and it defines how much light can go throw a material.
					csharp
CopyEdit
double pct = mat.Transparency; // 0-100
4. Legacy vs PBR Materials
Revit 2019 introduced “Advanced (PBR)” materials, but legacy Generic / Paint / Metal / Wood shaders are still everywhere.
You need to be aware of this because if you just use Materials shading color and opacity there is no difference, but it gets more complicated when you deal with textures:
| Trait | Legacy (Generic etc.) | PBR (Advanced) |
|---|---|---|
| Asset schema | “generic” | “advancedpbr” |
| Maps | Diffuse, Bump, Cutout, Tint | BaseColor, Roughness, Metallic, Normal |
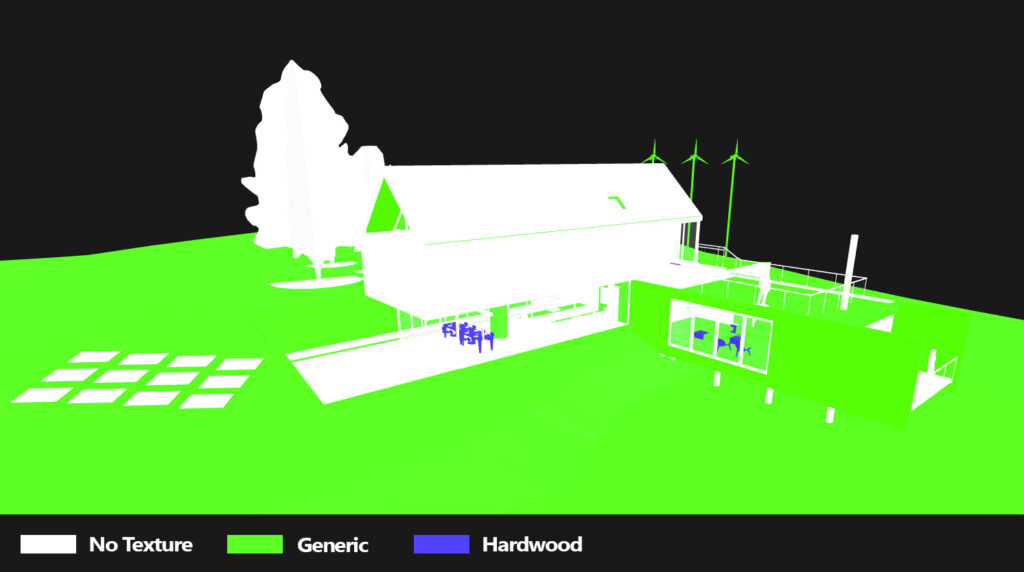
The Revit house, as you can see, only uses legacy materials like generic or Hardwood.
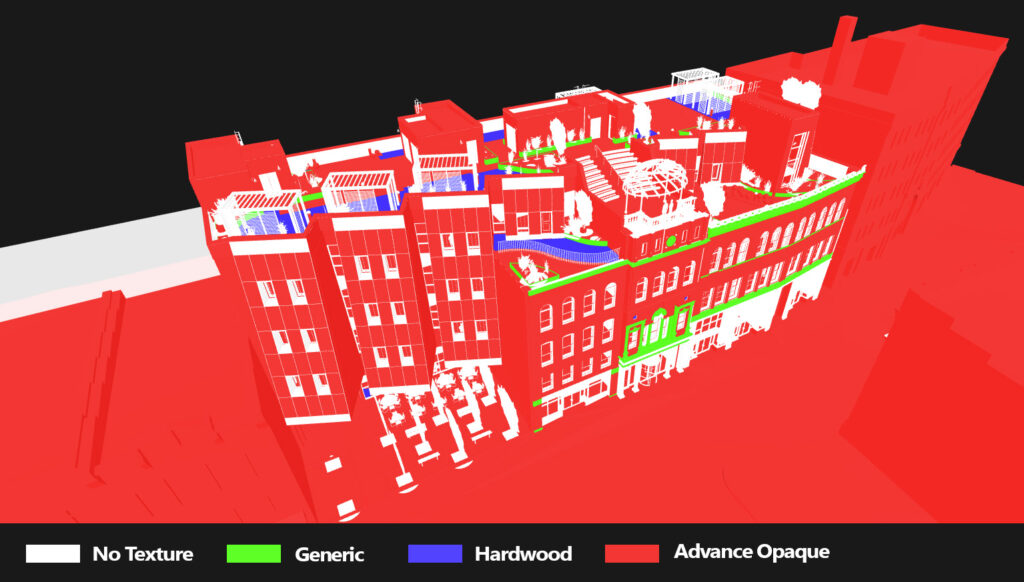
The newer Revit sample model Snowdon Towers users mostly advance materials but still some legacy generic and hardwood materials.
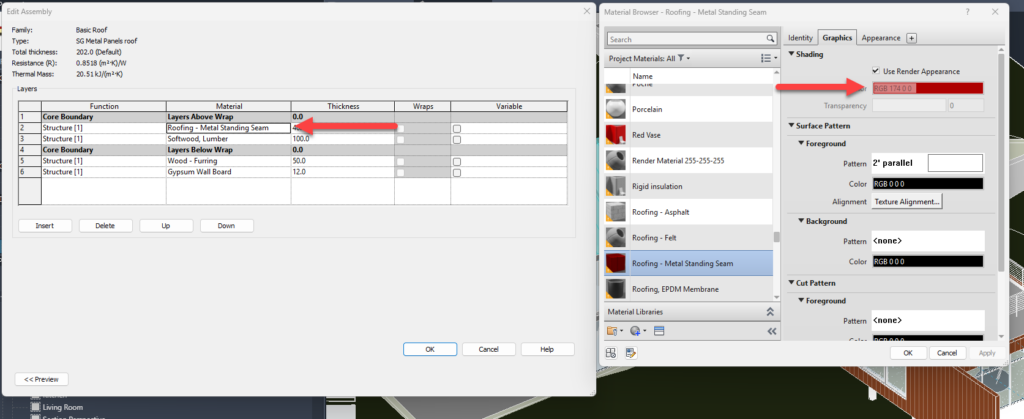
5. Material Base color
Previously, we discussed how to obtain the base color of a material in Revit.
However, it’s important to note that if the material includes a texture, Revit might use a separate base color associated with that texture.
This base color does not override the shading color when selecting a shaded view, but if there is a fading value applied to the textures it will be mixed with the Material base color and not the shading base color.
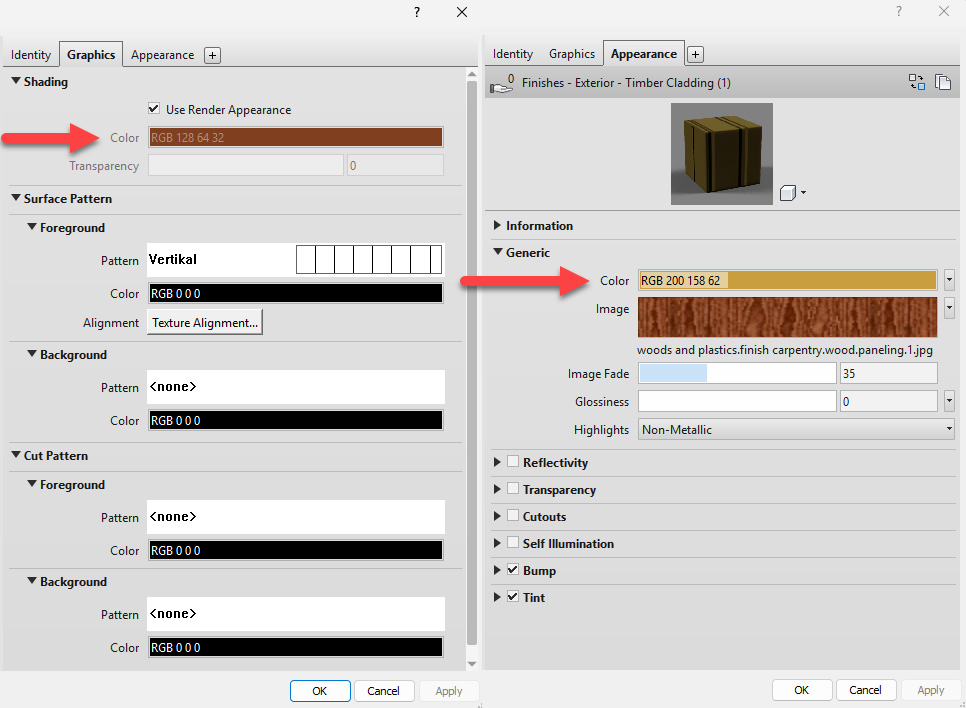

If you want to obtain the base color from the material asset you have to use the Generic Diffuse and then obtain the value as double and cast it to a Revit material like the following code:
					csharp


Autodesk.Revit.DB.Color appearenceColor = Autodesk.Revit.DB.Color.InvalidColorValue;
AssetPropertyDoubleArray4d colorProperty = theAsset.FindByName(Generic.GenericDiffuse) as AssetPropertyDoubleArray4d;

if (colorProperty != null)
{
		var colour = colorProperty.GetValueAsDoubles();
		appearenceColor = new Autodesk.Revit.DB.Color(
                    (byte)(colour[0] * 255.0),
                    (byte)(colour[1] * 255.0),
                    (byte)(colour[2] * 255.0));
 }
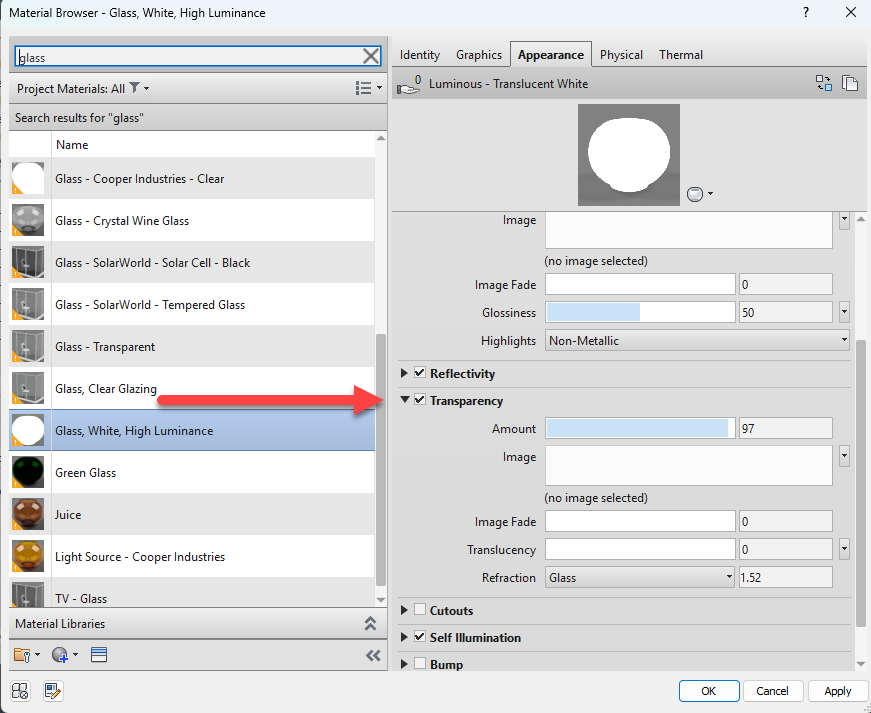
6. Material Transparency
Previously, we showed how to obtain the opacity of a material in Revit.
However, it’s important to be aware that some materials also define a separate transparency value, which can influence the final appearance of the material’s opacity.
In Revit’s material system, opacity and transparency are inversely related—transparency is typically defined as a value between 0 (fully opaque) and 1 (fully transparent), whereas opacity is often represented as 1 - transparency.
This means that even if a material has an opacity defined, the transparency property on the asset can override or further affect how transparent the material appears in renderings or exports.
Here’s a code snippet to retrieve the transparency value from a material asset:
					csharp

AssetProperty transparencyProp = asset.FindByName(Generic.GenericTransparency);
if (transparencyProp is AssetPropertyDouble transparency)
{
double transparencyValue = transparency.Value;
double opacity = 1.0 - transparencyValue;
TaskDialog.Show("Transparency Info", $"Transparency: {transparencyValue}, Opacity: {opacity}");
}
7. Other Modifiers
In addition to base color and transparency, Revit materials can include other modifiers that affect the final appearance of a material, such as tint, stain, reflectivity, and glossiness.
These modifiers are typically applied on top of the base texture or color and can significantly alter how the material is rendered.
For example, tint applies a color overlay to the texture, stain adds a coloration effect similar to tint but often with different blending behavior, and glossiness controls the sharpness of reflections.
These properties are stored in the material’s Asset and can be accessed through their respective property names. Below is a sample code snippet to retrieve some of these common modifiers:
					csharp

// Tint color
var tintProp = asset.FindByName("common_Tint_color") as AssetPropertyDoubleArray4d;
if (tintProp != null)
{
    IList<double> rgba = tintProp.GetValueAsDoubles();
    Color tintColor = new Color((byte)(rgba[0] * 255), (byte)(rgba[1] * 255), (byte)(rgba[2] * 255));
}

// Stain color
var stainProp = asset.FindByName("generic_stain_color") as AssetPropertyDoubleArray4d;
if (stainProp != null)
{
    IList<double> rgba = stainProp.GetValueAsDoubles();
    Color stainColor = new Color((byte)(rgba[0] * 255), (byte)(rgba[1] * 255), (byte)(rgba[2] * 255));
}

// Glossiness
var glossinessProp = asset.FindByName("generic_glossiness") as AssetPropertyDouble;
if (glossinessProp != null)
{
    double glossiness = glossinessProp.Value;
}

// Reflectivity
var reflectivityProp = asset.FindByName("generic_reflectivity") as AssetPropertyDouble;
if (reflectivityProp != null)
{
    double reflectivity = reflectivityProp.Value;
}
8. Pulling out base texture
Revit supports multiple types of materials—such as Generic, Metal, Wood, and others—each with its own structure and naming conventions for texture properties.
This means that when you’re trying to retrieve the base texture (diffuse or albedo), the property name can vary depending on the material type.
For example, a Generic material uses GenericDiffuse, while a Metal material may use SurfaceAlbedo, and a Hardwood material may store its texture in HardwoodColor.
To handle this variation and ensure compatibility across different material types, it’s best to check multiple possible property names. Below is a helper function and list of known diffuse property names used across different material classes:
					csharp
private static readonly string[] DIFFUSE_NAMES = {
    Autodesk.Revit.DB.Visual.AdvancedOpaque.OpaqueAlbedo,
    Autodesk.Revit.DB.Visual.Generic.GenericDiffuse,
    Autodesk.Revit.DB.Visual.AdvancedWood.WoodCurlyDistortionMap,
    Autodesk.Revit.DB.Visual.Hardwood.HardwoodColor,
    Autodesk.Revit.DB.Visual.AdvancedMetal.SurfaceAlbedo,
    Autodesk.Revit.DB.Visual.Default.StandardDiffuse,
    Autodesk.Revit.DB.Visual.Masonry.MasonryColor,
    Autodesk.Revit.DB.Visual.Tile.TileColor,
    Autodesk.Revit.DB.Visual.WallPaint.WallPaintColor,
    Autodesk.Revit.DB.Visual.Glass.TransmissionColor
};

public static Asset GetDiffuseBitmap(Asset theAsset)
{
    foreach (var name in DIFFUSE_NAMES)
    {
        var prop = theAsset.FindByName(name);
        if (prop?.NumberOfConnectedProperties > 0)
        {
            var connected = prop.GetSingleConnectedAsset();
            if (connected != null)
                return connected;
        }
    }

    return null;
}
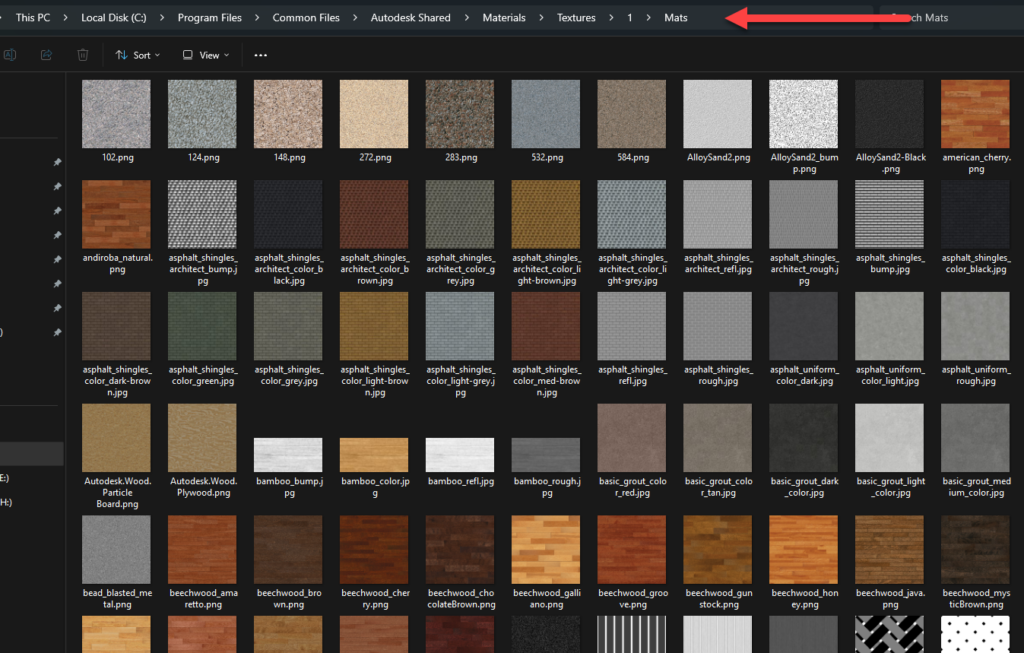
9. Obtain the Texture Path
Autodesk saves material textures in a standardized location across all Windows installations, which ensures consistency when referencing texture files from Revit materials.
This common directory is typically found under the system’s Common Program Files folder, inside a predefined Autodesk textures path.
When working with a Revit material asset, the texture path retrieved may be relative, so it’s essential to resolve it against this known base path to get the full absolute location.
The following method demonstrates how to extract the correct texture file path from a connected asset, handling both absolute and relative paths accordingly:
					csharp


public static string GetTexturePath(Asset connectedAsset)
{
    if (connectedAsset != null)
    {
        var bitmapPathProp = connectedAsset.FindByName(UnifiedBitmap.UnifiedbitmapBitmap) as AssetPropertyString;

        if (bitmapPathProp != null && !string.IsNullOrEmpty(bitmapPathProp.Value))
        {
            string texturePath = bitmapPathProp.Value.Split('|')[0].Replace("/", "\\");

            if (!Path.IsPathRooted(texturePath))
            {
                string materialsPath = Path.Combine(
                    Environment.GetFolderPath(Environment.SpecialFolder.CommonProgramFiles),
                    AUTODESKPATHTEXTURES); // e.g., "Autodesk Shared\Materials\Textures"
                texturePath = Path.Combine(materialsPath, texturePath);
            }

            return texturePath;
        }
    }

    return null;
}

private const string AUTODESKPATHTEXTURES = @"Autodesk Shared\Materials\Textures\";
This ensures your application correctly resolves texture locations regardless of whether Revit provides an absolute or relative path, enabling reliable access to image files used in material definitions.
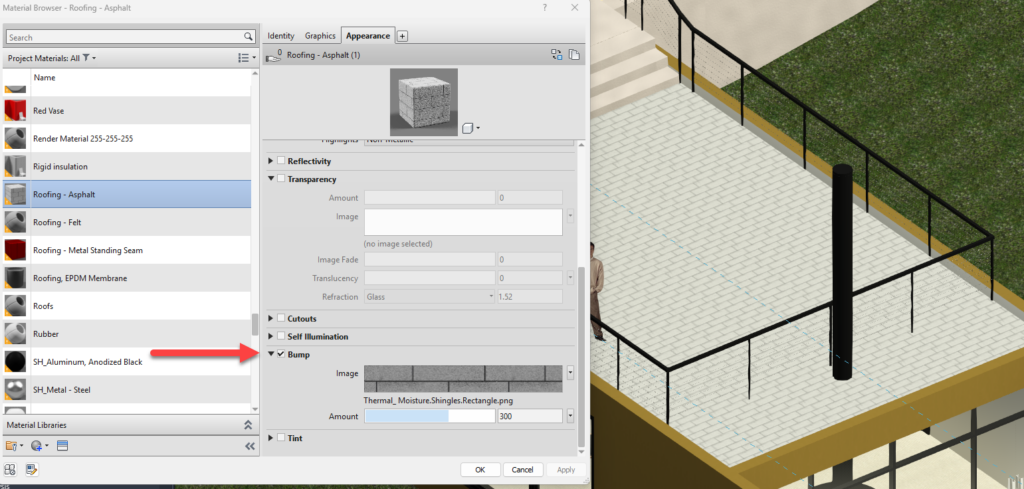
10. Bump
A bump map is a grayscale texture used to simulate surface detail on a material—such as roughness, grooves, or embossing—without altering the actual geometry.
It creates the illusion of depth by modifying the surface normals during rendering, which affects how light interacts with the surface.
In Revit, bump maps are typically stored as a connected asset within the material’s Asset object, under a property like "generic_bump_map".
To retrieve this bump texture, you can check for this property and then extract the connected asset, similar to how diffuse textures are handled.
Here’s an example of how to access the bump map from a material:
					csharp

public static Asset GetBumpMap(Asset asset)
{
    var bumpProp = asset.FindByName("generic_bump_map");
    if (bumpProp?.NumberOfConnectedProperties > 0)
    {
        var connected = bumpProp.GetSingleConnectedAsset();
        if (connected != null)
            return connected;
    }

    return null;
}
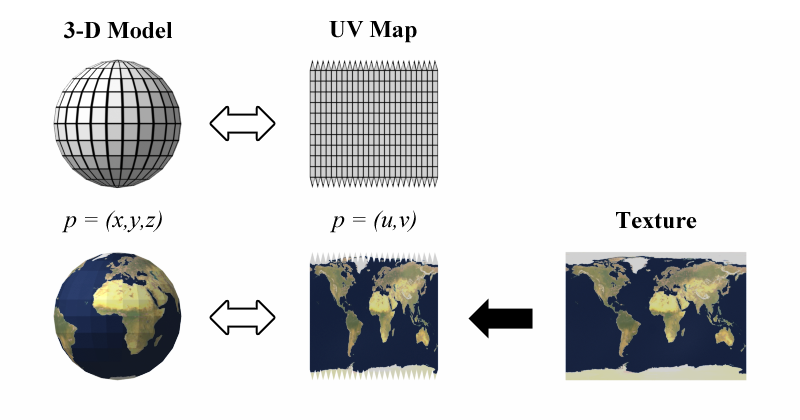
11. Understanding UV Coordinates in Revit
UVs, or texture coordinates, are a set of 2D coordinates used to map a texture image onto a 3D model’s surface.
The term “UV” refers to the axes of the texture space (U and V), analogous to X and Y in 2D space.
Each vertex in a mesh is assigned a UV coordinate, which tells the rendering engine which part of the texture to apply to that vertex.
When combined across all vertices, UVs control how the texture is stretched, rotated, and positioned across the surface of the model:
In Revit, UVs can be accessed through geometry objects like PolymeshTopology, which provides methods such as GetUVs() to retrieve texture coordinates for each vertex.
These UVs are crucial for accurately displaying textures in exports to formats like glTF, where the visual fidelity of the model depends on correct texture placement.
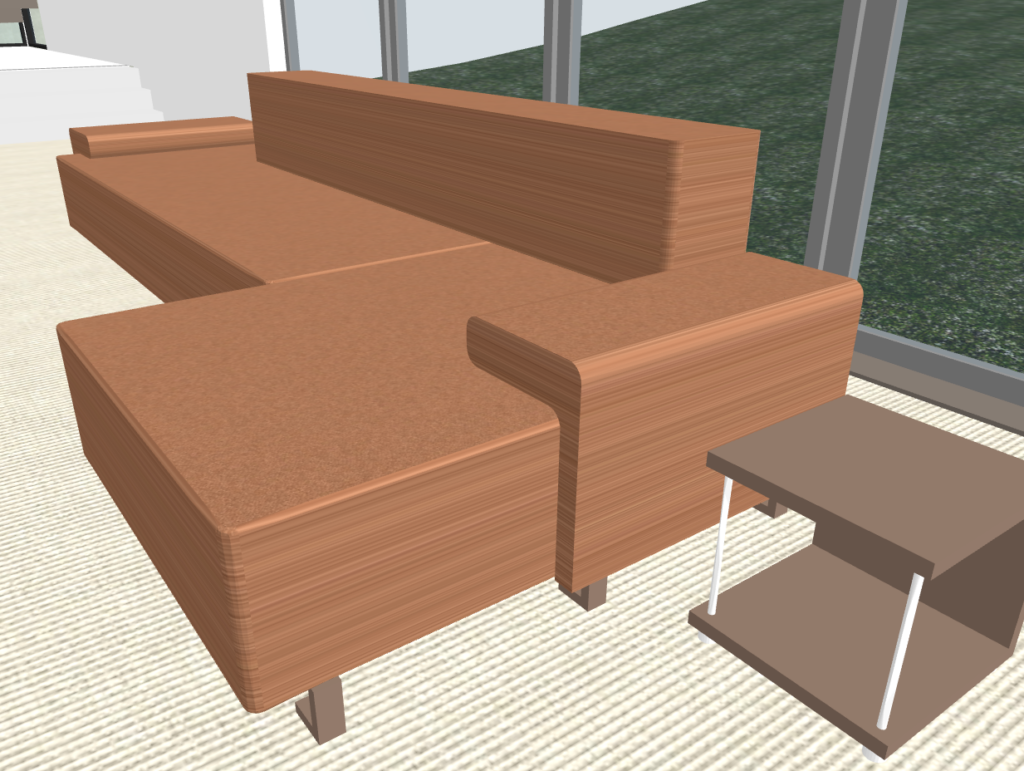
At first instead of using the UVs provided by Revit I tried to calculate them and it mostly worked in exception of round services like the coach you see in the image above, but this illustrates why UVs are so important.
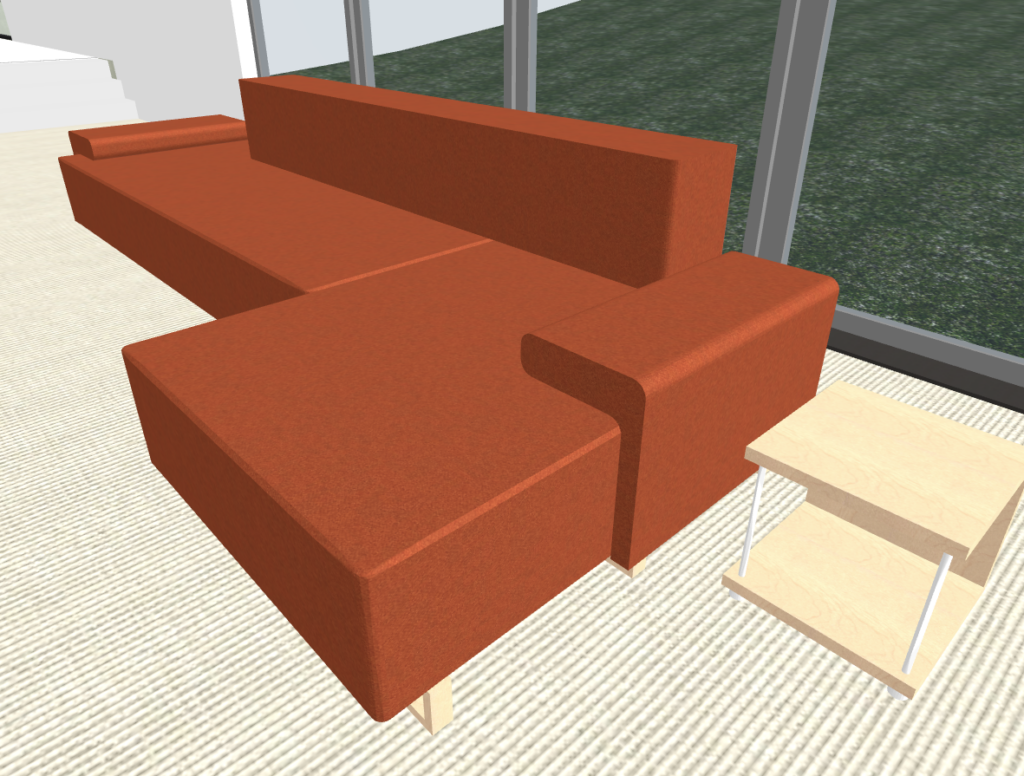
The image above is after implementing obtaining UVs calculated by Revit.
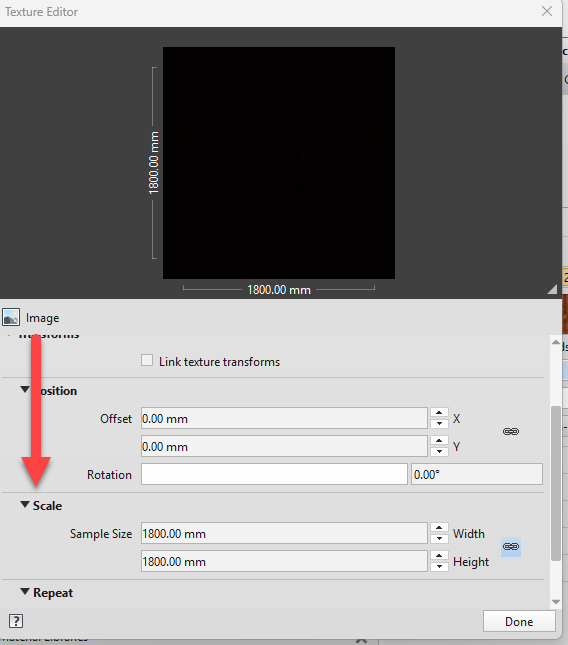
12. Texture Scale (Repeat)
Both legacy and PBR assets expose real-world scale in model units (usually feet inside Revit files). This might change how big or small the texture looks.
					csharp
CopyEdit
double ScaleFactorFeetToMeters = 0.3048;
XYZ scaleRevit = bitmapScale;           // from GetBitmap()
Vector2 repeat = new Vector2(
    1 / (scaleRevit.X * ScaleFactorFeetToMeters),
    1 / (scaleRevit.Y * ScaleFactorFeetToMeters));
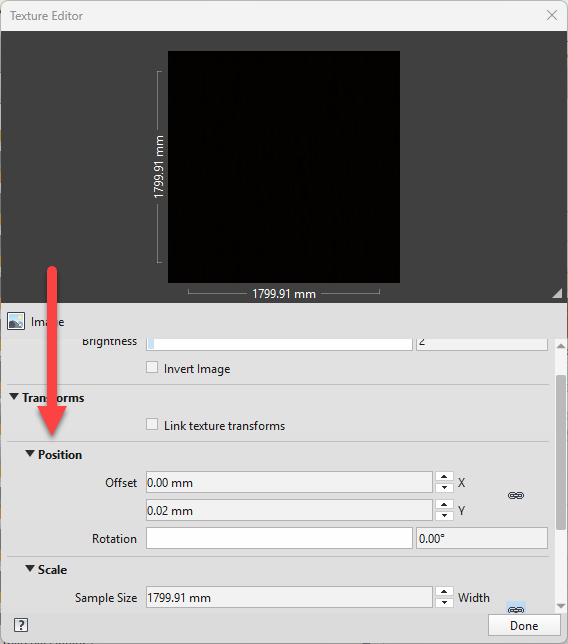
13. Texture Offset
Offsets are less obvious: legacy assets expose generic_offset.
PBR assets rename it uv_offset. This is used when you want a texture to aligned with the border of a geometry for example.
					csharp
CopyEdit
Vector2 GetOffset(AssetPropertyBitmap bmp)
{
    var off = bmp.FindByName("uv_offset") as AssetPropertyDoubleArray2d
           ?? bmp.FindByName("generic_offset") as AssetPropertyDoubleArray2d;

    return off != null ? new Vector2((float)off[0], (float)off[1]) : Vector2.Zero;
}
Elevating BIM Exports: Leveraging Revit Materials for Realistic glTF Visuals
At e-verse, we’ve developed over a hundred Revit add-ins, but Revit materials are often overlooked in favor of geometry or structural elements, but they hold crucial visual data such as textures, bump maps, transparency, and UV coordinates.
These properties are key to translating models into formats like glTF, USD, IFC, etc., maintaining visual integrity across platforms or applications.
When properly utilized, Revit’s material system can enhance exports, creating realistic and detailed models.
While typically seen as secondary, these materials are powerful tools that elevate the quality and appearance of BIM models, proving essential for high-quality, visually accurate exports.

Valentin Noves
I'm a versatile leader with broad exposure to projects and procedures and an in-depth understanding of technology services/product development. I have a tremendous passion for working in teams driven to provide remarkable software development services that disrupt the status quo. I am a creative problem solver who is equally comfortable rolling up my sleeves or leading teams with a make-it-happen attitude.