How to create your first Unity BIM viewer: Part I

What is Unity?
A sizable and vibrant community of developers worldwide utilizes the cross-platform Unity game engine and development platform to produce 2D and 3D games, simulations, and other interactive content.
Unity is renowned for its robust and user-friendly tools for building interactive 3D apps and environments. It comes with a visual editor, scripting tools, and several additional capabilities that enable the creation of a wide range of material, including games, simulations, and other interactive experiences.
Unity is utilized in many different industries in addition to the game production business, including architecture, engineering, and construction (AEC).
In this post, we will show you how to create a project from scratch, import a Revit model, and then host it on a static web.

How can we use it in the AEC industry?
Some applications for Unity in the AEC sector include:
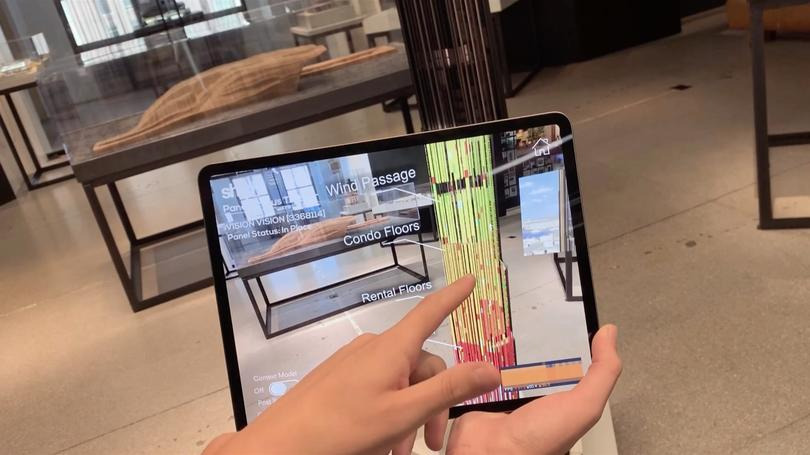
- Applications for virtual reality (VR) and augmented reality (AR): With Unity, architects, engineers, and construction workers can develop immersive VR and AR experiences that let them view and interact with designs and construction sites virtually. This may be used for stakeholder involvement, design review, and training needs.
- 3D modeling and visualization: Buildings, structures, and other AEC projects may be created as 3D models and visualizations using Unity. These models can be used for communication, analysis, and design tasks.
- Construction simulation: Professionals may test and refine their ideas before breaking ground by using Unity to generate simulations of the construction processes.
- Collaboration and communication: Unity can create interactive 3D models that can be shared and collaborated on by multiple team members, allowing for more effective communication and coordination.
But all the options above are only some of many others.
Why Unity?
For starters, Unity’s user-friendly interface and abundant online tutorials and documentation make it an excellent choice for the AEC sector. These features make it simple for newcomers to start developing games.
Numerous platforms, including iOS, Android, PC, Mac, Linux, Xbox, PlayStation, and Nintendo Switch, are supported by Unity. This makes it possible for developers to make products that work on several devices.
The good news is that not only you can write in C#, but Unity also provides a visual scripting tool called “Playmaker” that allows developers to build a solution without writing code. Users need to code scripts to use Unity to its full potential.
There is also a large and active community of users, which means there are lots of resources and support available for developers. Even for the AEC alone, there are many custom solutions like Visuallive or Unity Reflect.
How to start?
- First of all, download Unity Hub from this link.
- Install a Unity version. At the moment of the release of this post, the latest version is 2021.3.11f1. You should download the latest and stick to it, or sometimes, when updating versions in the middle of a project, you might experience compatibility issues.
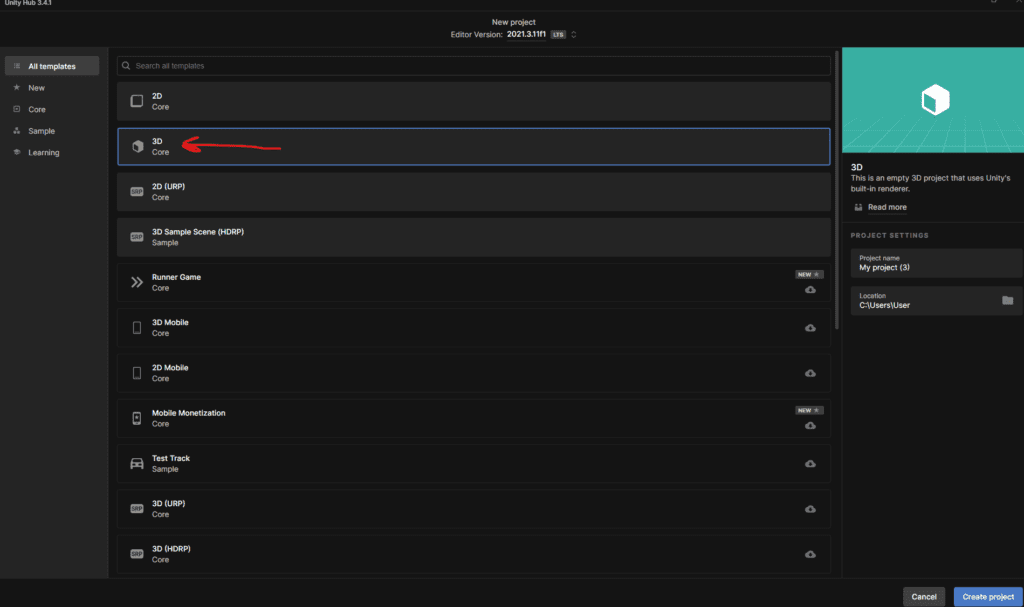
- Go to Projects > New Project. When doing this, the first thing you notice is that most of the templates are divided into 2D and 3D, the first one is to create experiences like the legendary Mario Bros (or something contemporary like my favorite Hollow Knight), and the latter is to develop solutions in 3D like Pokemon GO or Beat saber, so we are going to select the option 3D core.
The interface
Unity’s interface might look simple at first glance but don’t overestimate the complexity of the beast.
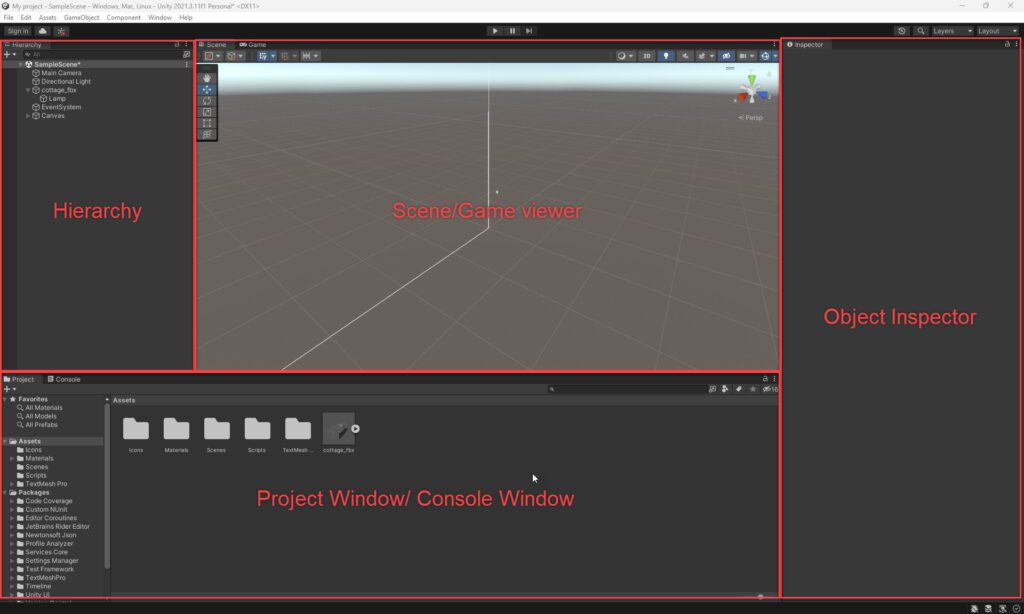
The main four sections are:
- Hierarchy Tree: Here, you can visualize the different elements and parts of the scene, for example, the parts of a door in a house
- Scene/Game viewer: On the scene viewer, you will visualize what you are putting together, and on the game viewer, you will run the solution
- Game object inspector: Provides properties and options for the different elements added to the scene.
- Project window/console: Here, you will visualize your assets and the console to debug the code.
Export from Revit to Unity
We are going to use a Revit model to create our viewer. The most common formats that Unity can read are: FBX, DAE, DXF, and OBJ. There are more formats on the official documentation, or other possibilities like glTF by installing external libraries.
There are many tools to do this, like Unity Reflect, which allows checking live changes between Revit or the Export to Unity plugin by ef. In our case, we will use the most straightforward solution: the FBX exporter that comes with Revit. Also, if you want to export using DWFx, you can always follow the tutorial from the vrforCAD guys.
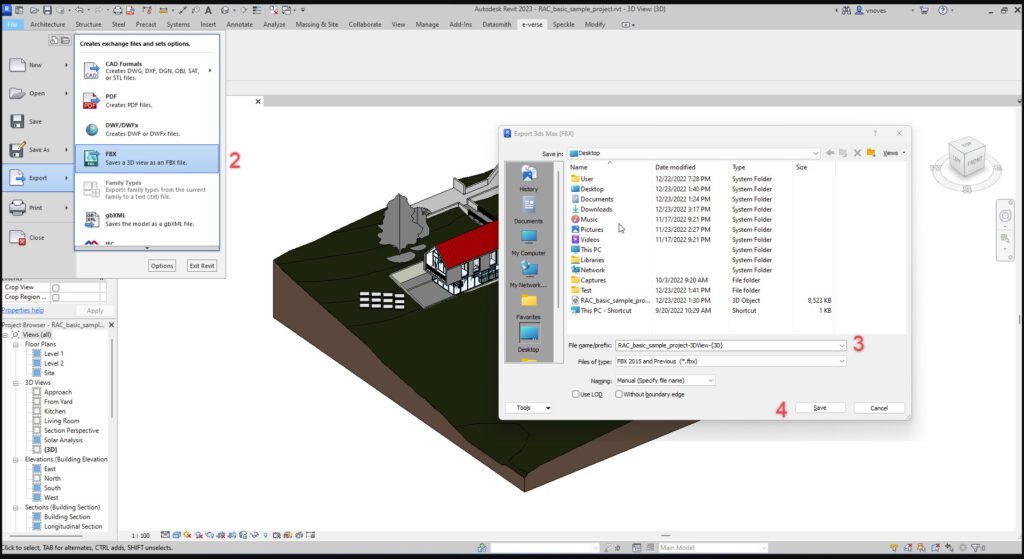
To export a model from Revit to FBX, you can use the following steps:
- In Revit, select the view that you want to export.
- Go to the “File” menu and select “Export.”
- In the “Export” dialog, select “FBX (*.fbx)” as the file type.
- Choose a location to save the exported file and click “Export.”
Import an FBX into Unity
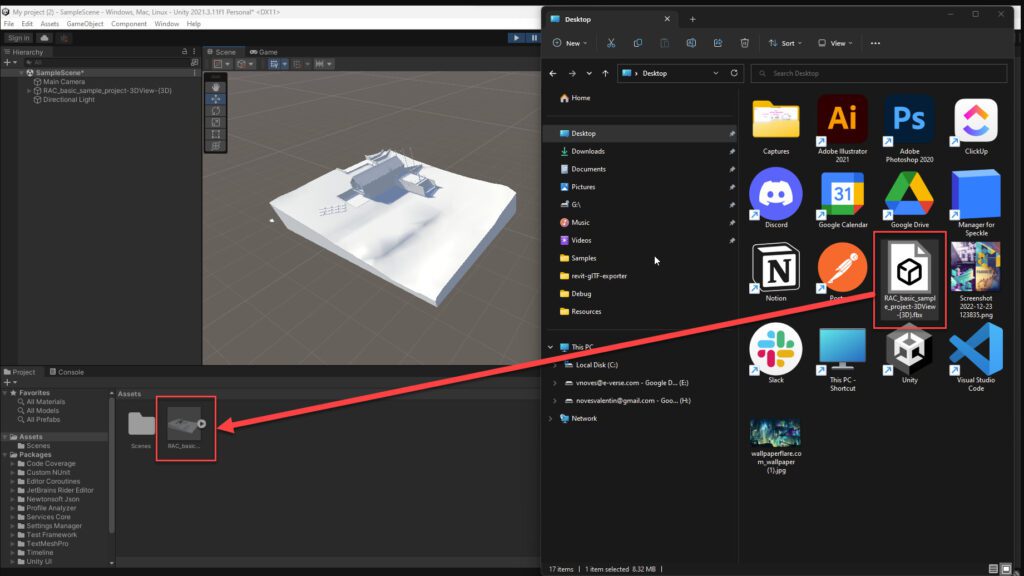
- In Unity, go to the “Assets” menu and select “Import New Asset.”
- In the “Import Asset” dialog, select the FBX file you exported from Revit and click “Import.”
- The model will be imported into Unity and added to the “Project” panel. Now select it and drop it on the scene panel.
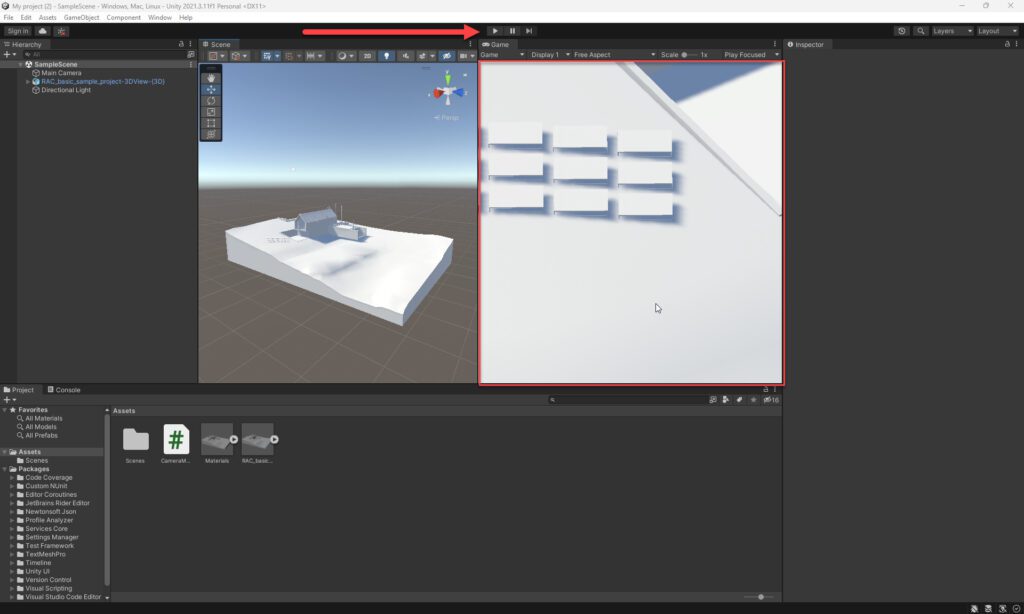
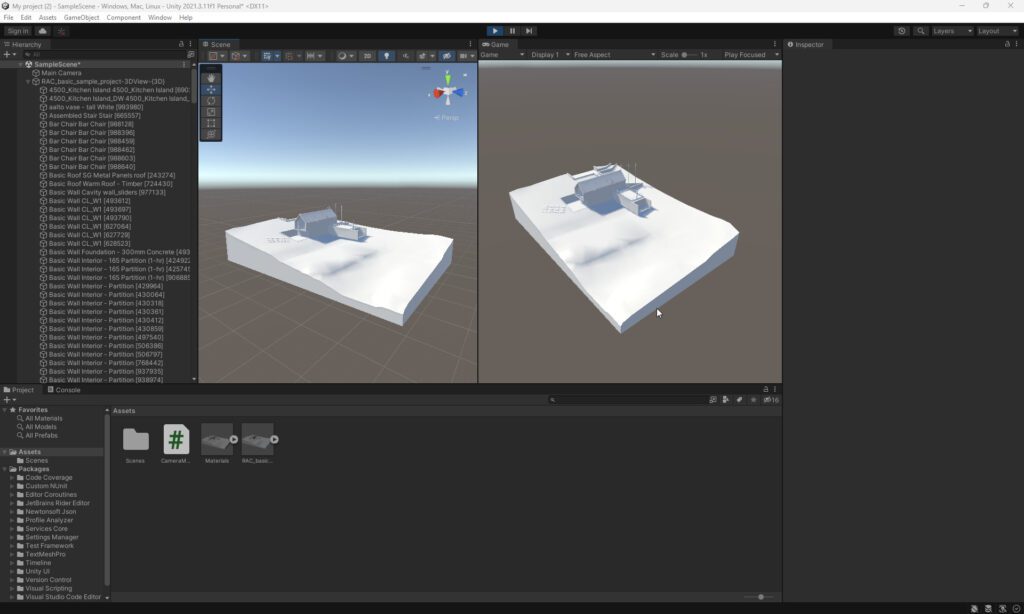
If you want to visualize how the model will look in your viewer, you have to select the play button. I recommend having the Scene view next to the Game view, like in the image below.
Add a camera for navigation purposes
If you visualize your model, you will realize that the camera is not moving. For that, we need to implement custom code to make the camera move or rotate based on triggered events like pressing the arrow keys or using the mouse.
These pieces of custom code are called a script, which allows you to create your components, trigger game events, modify Component properties over time, and respond to user input in your projects.
Scripts can be attached to GameObjects in the scene to give them custom behavior. For example, you might create a script that causes a character to move when the player presses a key or makes a door open when the player clicks on it.
Scripts are written in a programming language such as C#, UnityScript (a variant of JavaScript), or Boo (a language similar to Python).
To make our camera move and create our script, we need to follow these steps:
- In the Unity editor, select the “Main Camera” object.
- In the Inspector window, click the Add Component button.
- In the Add Component menu, select New Script.
- In the Create Script dialog, enter a name for the script and choose c# language.
- Click the Create and Add button to create the script and attach it to the selected “Main Camera.”
- The new hand will appear in the Project window. Double-click the script to open it in your code editor. In my case, I use Visual Studio.
- Write the code below
					using System.Collections;
using System.Collections.Generic;
using UnityEngine;

public class CameraManager : MonoBehaviour
{
    public float rotationSpeed = 1;
    public float translationSpeed = 20;
    public float mouseSensitivity = 7.0f;
    private bool isMouseClicked = false;
    public Vector2 turn;

    public float mouseSensitivityPan = 0.05f;
    private Vector3 lastPosition;

    public Texture2D cursorTexture;
    private CursorMode cursorMode = CursorMode.Auto;
    private Vector2 hotSpot = Vector2.zero;


    void Start()
    {

    }

    // Update is called once per frame
    void Update()
    {
        rotateMouse();
        zoomMouse();
        panMouse();
        keysMovement();
    }

    private void keysMovement()
    {
        if (Input.GetKey(KeyCode.W))
        {
            transform.Translate(Vector3.forward / 50 * translationSpeed, Space.Self);
        }
        if (Input.GetKey(KeyCode.A))
        {
            transform.Translate(Vector3.left / 50 * translationSpeed, Space.Self);
        }
        if (Input.GetKey(KeyCode.S))
        {
            transform.Translate(Vector3.back / 50 * translationSpeed, Space.Self);
        }
        if (Input.GetKey(KeyCode.D))
        {
            transform.Translate(Vector3.right / 50 * translationSpeed, Space.Self);
        }
    }


    private void rotateMouse()
    {
        if (Input.GetMouseButtonDown(0))
        {
            isMouseClicked = true;
        }
        if (Input.GetMouseButtonUp(0))
        {
            isMouseClicked = false;
        }
        if (isMouseClicked)
        {
            turn.x += Input.GetAxis("Mouse X") * mouseSensitivity;
            turn.y += Input.GetAxis("Mouse Y") * mouseSensitivity;
            transform.localRotation = Quaternion.Euler(turn.y, turn.x, 0);
        }
    }

    private void zoomMouse()
    {
        float ScrollWheelChange = Input.GetAxis("Mouse ScrollWheel");

        if (ScrollWheelChange != 0)
        {                                            //If the scrollwheel has changed
            float R = ScrollWheelChange * 15;                                   //The radius from current camera
            float PosX = Camera.main.transform.eulerAngles.x + 90;              //Get up and down
            float PosY = -1 * (Camera.main.transform.eulerAngles.y - 90);       //Get left to right
            PosX = PosX / 180 * Mathf.PI;                                       //Convert from degrees to radians
            PosY = PosY / 180 * Mathf.PI;                                       //^
            float X = R * Mathf.Sin(PosX) * Mathf.Cos(PosY);                    //Calculate new coords
            float Z = R * Mathf.Sin(PosX) * Mathf.Sin(PosY);                    //^
            float Y = R * Mathf.Cos(PosX);                                      //^
            float CamX = Camera.main.transform.position.x;                      //Get current camera postition for the offset
            float CamY = Camera.main.transform.position.y;                      //^
            float CamZ = Camera.main.transform.position.z;                      //^
            Camera.main.transform.position = new Vector3(CamX + X, CamY + Y, CamZ + Z);//Move the main camera
        }
    }

    private void panMouse()
    {
        if (Input.GetMouseButtonDown(1) || Input.GetMouseButton(2))
        {
            Cursor.SetCursor(cursorTexture, hotSpot, cursorMode);
            lastPosition = Input.mousePosition;
        }

        if (Input.GetMouseButton(1) || Input.GetMouseButton(2))
        {
            var delta = Input.mousePosition - lastPosition;
            transform.Translate(delta.x * mouseSensitivityPan, delta.y * mouseSensitivityPan, 0);
            lastPosition = Input.mousePosition;
        }

        if (Input.GetMouseButtonUp(1) || Input.GetMouseButtonUp(2))
        {
            Cursor.SetCursor(null, hotSpot, cursorMode);
        }
    }
}
8. Save the script file and return it to the Unity editor. The changes you made to the script will be automatically applied in the Unity editor.
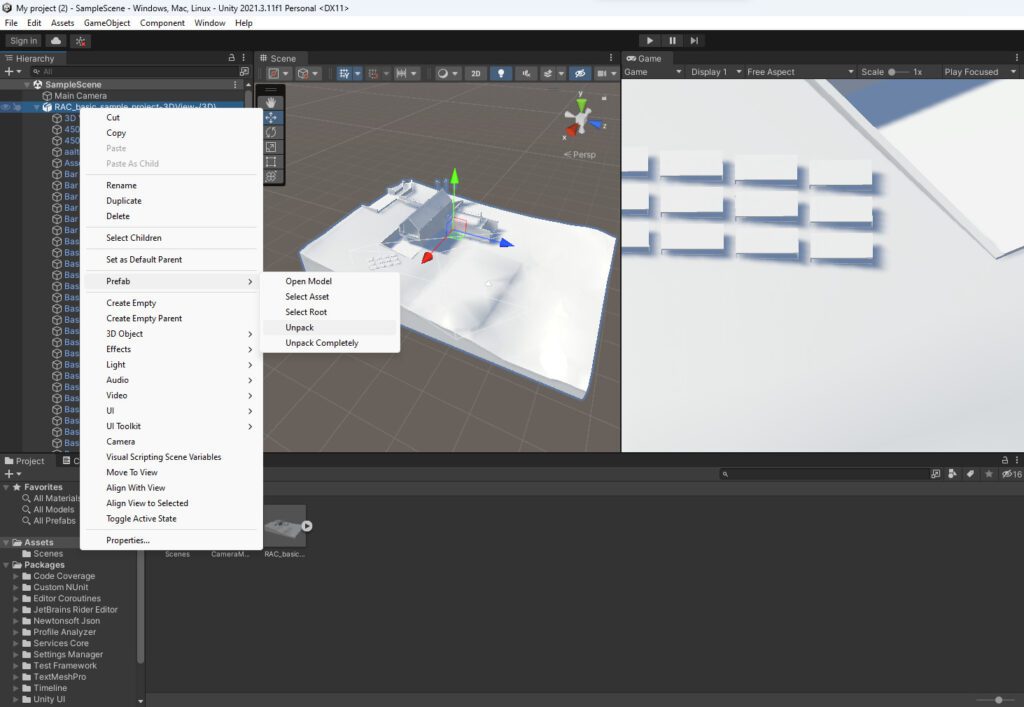
In a normal situation, if you click play now, you should be able to navigate the model with the arrow keys and the mouse, but given that a camera was exported with our FBX, you have to right-click our FBX> Prefab > Unpack.
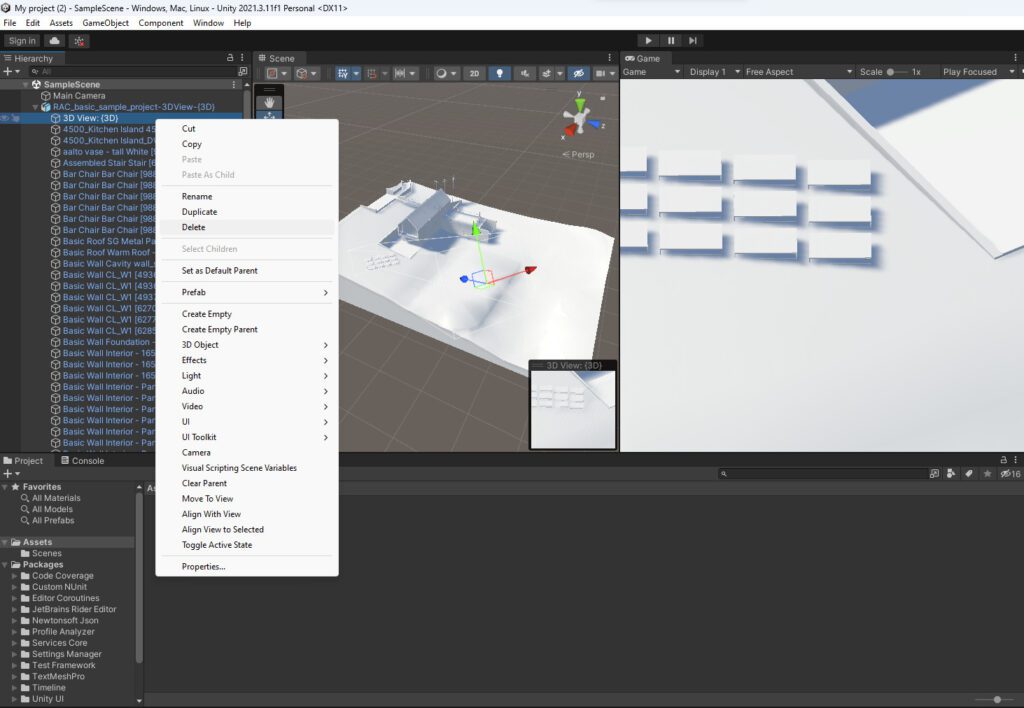
After that, select the name of the Revit view that you used to export out of Revit (in my case, “3D View: {3D}” )
Now click Play again, and you should be able to move around
How to build a project?
Being Unity a cross-platform engine, you have multiple export options like Desktop, mobile, dedicated server, PS5, or, as in our case, we are going to export to WebGL, a JavaScript API for rendering interactive 2D and 3D graphics within any compatible web browser, to upload it to a static storage in AWS later.
- In the top menu, go to “File > Build Settings…”
- In the “Platform” list, select “WebGL”
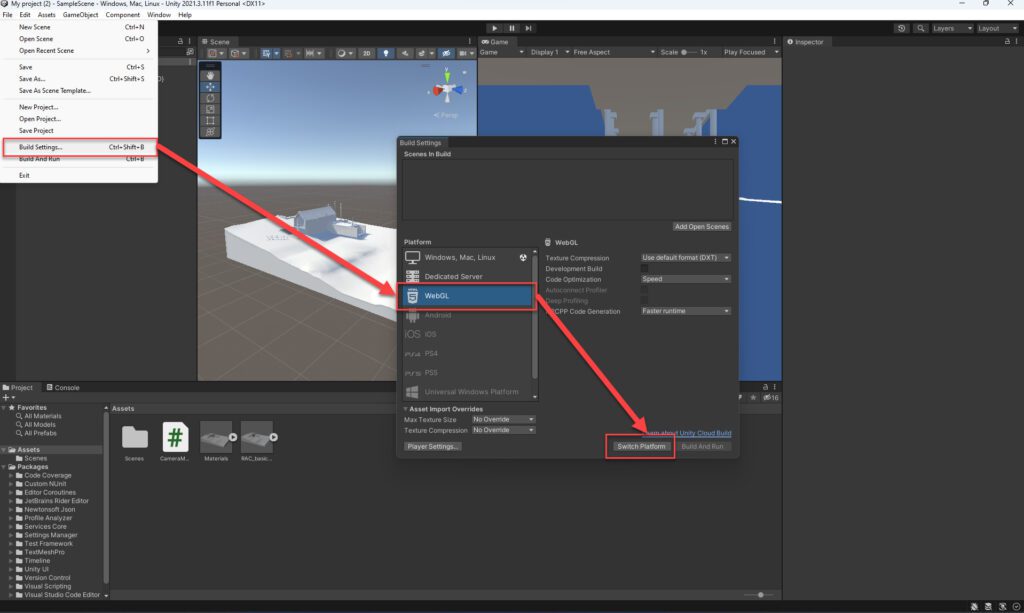
3. Click “Switch Platform” to set the active build target to WebGL.
4. Click the “Player Settings” button to open the player settings in the Inspector window.
5. In the Inspector window, go to the “Other Settings” panel.
6. Under “Publishing Settings,” enable the Decompression fallback
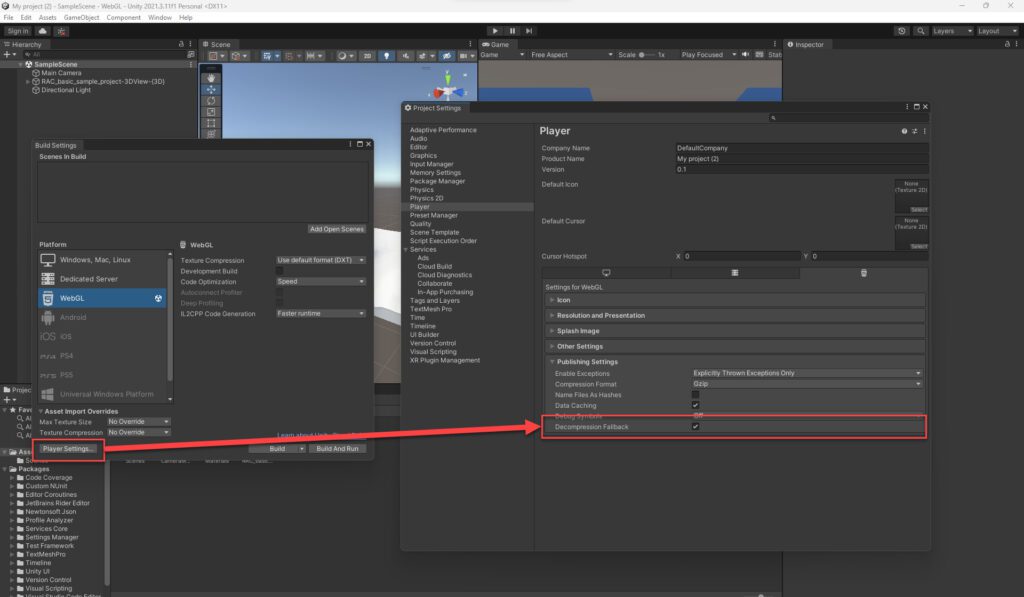
7. Click the “Build and run” button.
8. In the “Build Settings” window, choose a location to save the built project and click “Select Folder.”
9. Unity will then build the project and create a folder with the made game, which you can upload to a web server to be played in a web browser.
Note: Building a project for WebGL requires that your computer has a WebGL build target installed. If it is not installed, you will be prompted to install it when you switch the build target to WebGL.
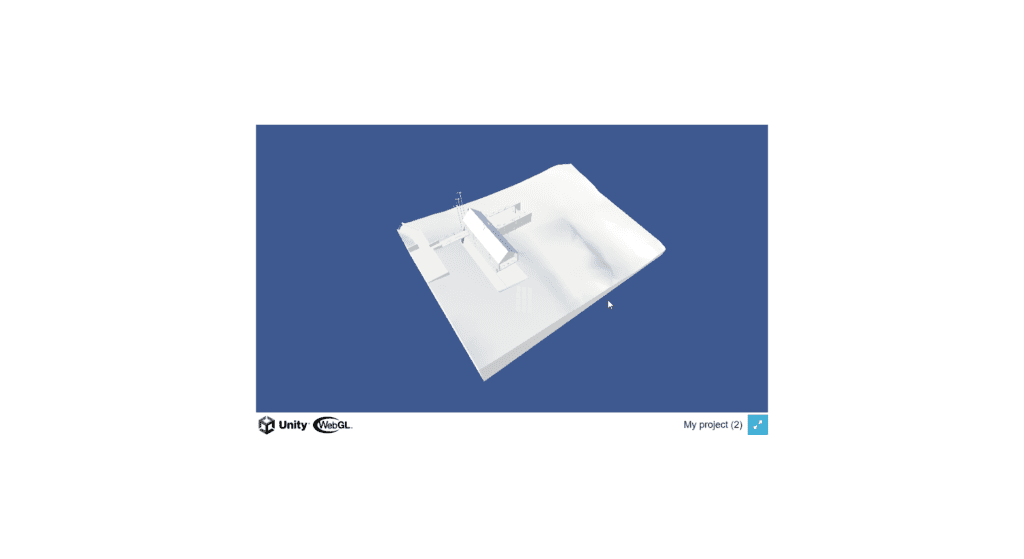
After the build, you should see something like this open on your default browser. This is running locally on your computer.
There is a playful and fun road ahead
In conclusion, Unity with BIM models can provide a robust and immersive tool for visualizing and interacting with building design and construction data. By importing BIM models into Unity, users can benefit from the platform’s real-time rendering capabilities, allowing for more accurate and interactive visualization of design concepts.
This is the start of a series on how to work with Unity in the AEC industry. In the future, we will show how to add more fun stuff like materials, animations, deploy on the web, dynamically loading files, etc. What would you like to learn from other articles?

Valentin Noves
I'm a versatile leader with broad exposure to projects and procedures and an in-depth understanding of technology services/product development. I have a tremendous passion for working in teams driven to provide remarkable software development services that disrupt the status quo. I am a creative problem solver who is equally comfortable rolling up my sleeves or leading teams with a make-it-happen attitude.