A simple Slackbot to track your BIM360/ACC model changes

Most of the time, innovation involves using existing technologies in new ways.
Here we propose you use Slack, AWS Lambda, and Autodesk Platform Services (formally Forge) to track changes in your BIM360/ACC hubs.
Today, Slack is one of the most prominent instant messaging program in the market. We love Slack and we love its integrations with almost everything, as you can check on our previous post Slackbot using lambda functions.
AWS Lambda is a service that allows you to create small services quickly and at a low cost. Imagine a function doing only one thing once in a while.
You don’t need to create a whole service running 24/7 to run it. You use serverless services such as Lambda to make this specific function available online.
Suppose serverless technology with Autodesk Service Platform (which I’ll refer as Forge from now on), a platform of APIs enabling you to access cool functions in Autodesk cloud services, you can automate a lot of your processes.
Today we’ll show you how to use these technologies to create your custom Slack bot police to track changes in your BIM360/ACC projects using only 4 steps:
- Create a slackbot
- Create a middleman
- Create an Autodesk Webhook
- Create a message builder
Step 1: Create a Slackbot
Creating a slack bot is quite simple,
- You only need admin access to your space and go to the API section https://api.slack.com/apps/
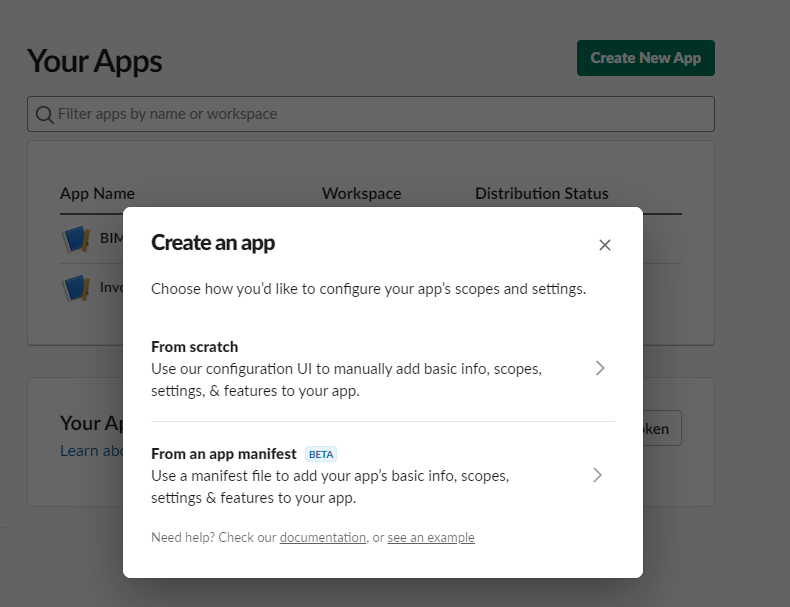
- Click on “Create an app”
- Select do it from Scratch
- Select a name and the workspace you want the app to work on.
From all the options you see inside the apps menu, do this:
- Select “Incoming Webhook”.
- Click to turn it on.
- Click on “Add a new webhook to workspace”.
- Select a channel or person to communicate.
- You’ll see a new URL on the webhook list ready to use.
We’ll test the bot by posting a simple message thru Postman
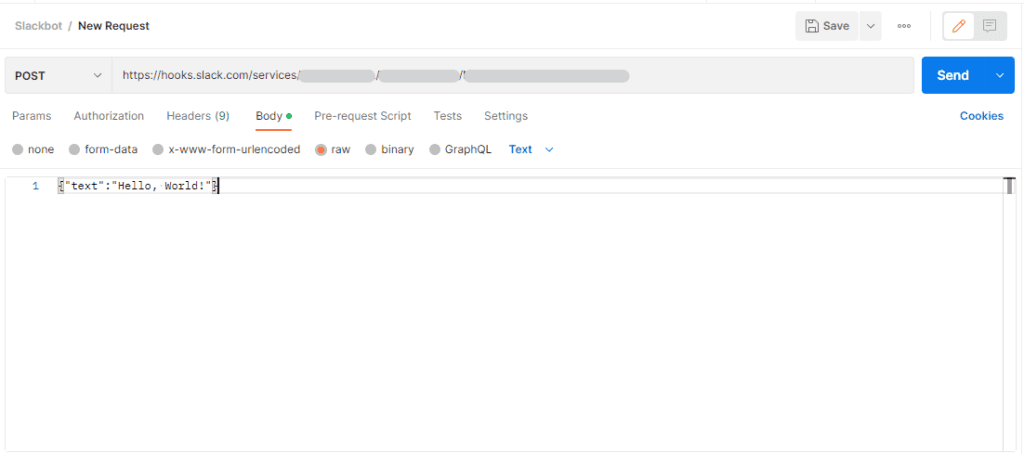
If it works, the channel or person you selected should receive a new message like this one:

Step 2: Creating a middleman
Information coming from Autodesk is not presented in a way Slack can send to the user. So we need to create a middleware to parse it and send it to slack as a message.
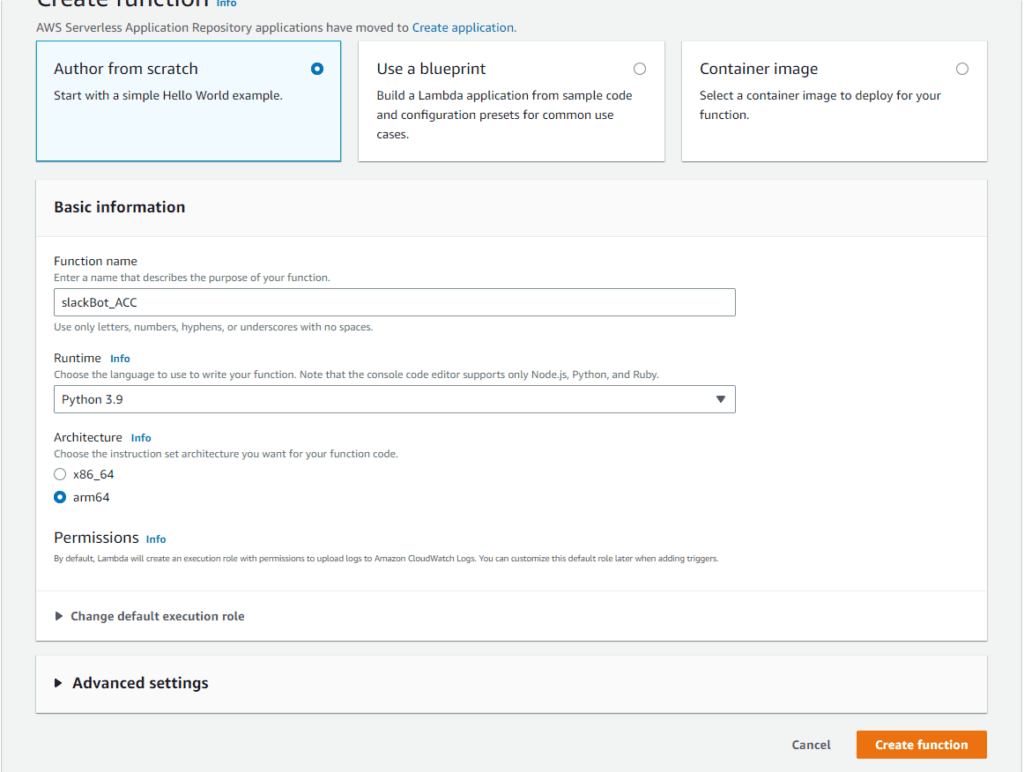
We’ll use AWS lambdas because they are simple to create and deploy and also really cheap if you don’t need them to be 24/7 processing information.
From scratch, we select a python 3.9 runtime executing on an ARM architecture to reduce costs.
While you can use any type of stack you prefer, we use python because it follows a batteries-included philosophy. For simple tasks like this one, all libraries we’ll need are already there.
After creating the lambda, you’ll see a code editor with sample code for you to change.
We’ll add a new print statement in line 5 to see what Autodesk is sending us on the webhook payload. Remember to leave the return because the webhook needs to receive a 200 code every time it calls this lambda, no matter if the process fails.
					import json

def lambda_handler(event, context):
    # TODO implement
    print(json.dumps(context))
    return {
        'statusCode': 200,
        'body': json.dumps('Hello from Lambda!')
    }
Once you are done with the change,
- Click on “Deploy”.
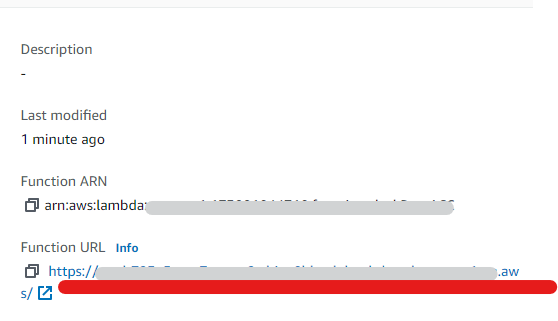
- Go to “Configuration“ and “Function URL”.
- Click on “Create function URL” to receive a URL for your function.
- As this is just a demo, we will select Auth “None” when the authentication options are prompt.
Your new function URL will be displayed here:
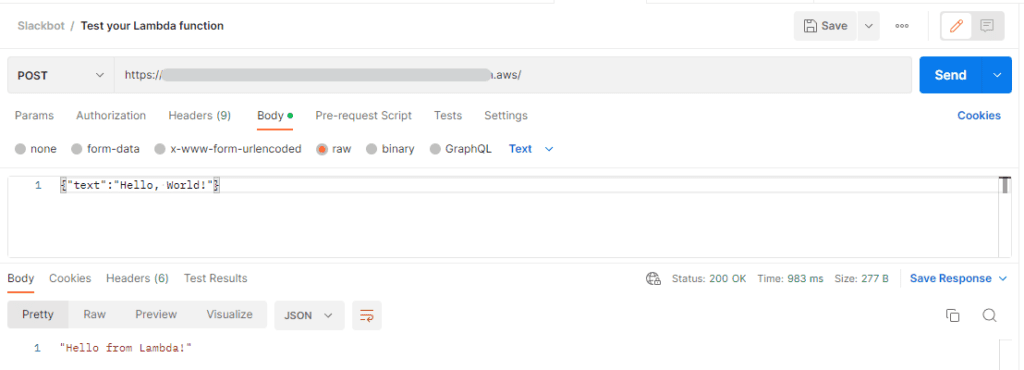
Let’s go back to Postman and test our new function. As you can see below, we receive the response body configurated in the lambda function template.
Now we go back to the lambda function to see the latest events. You can find them in “Monitor” and then “Log”.
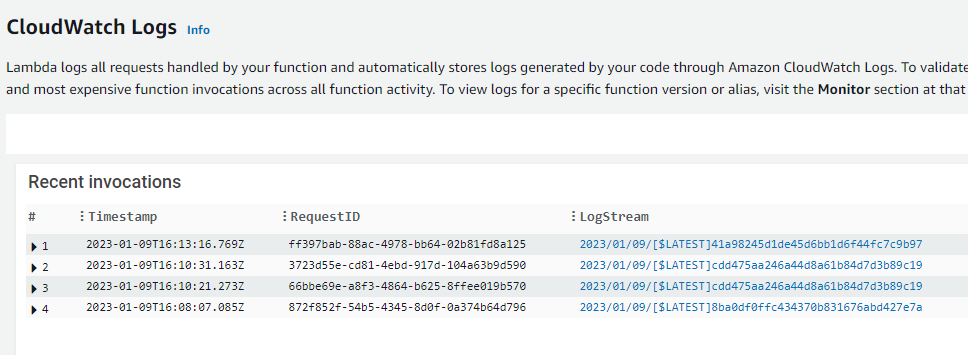
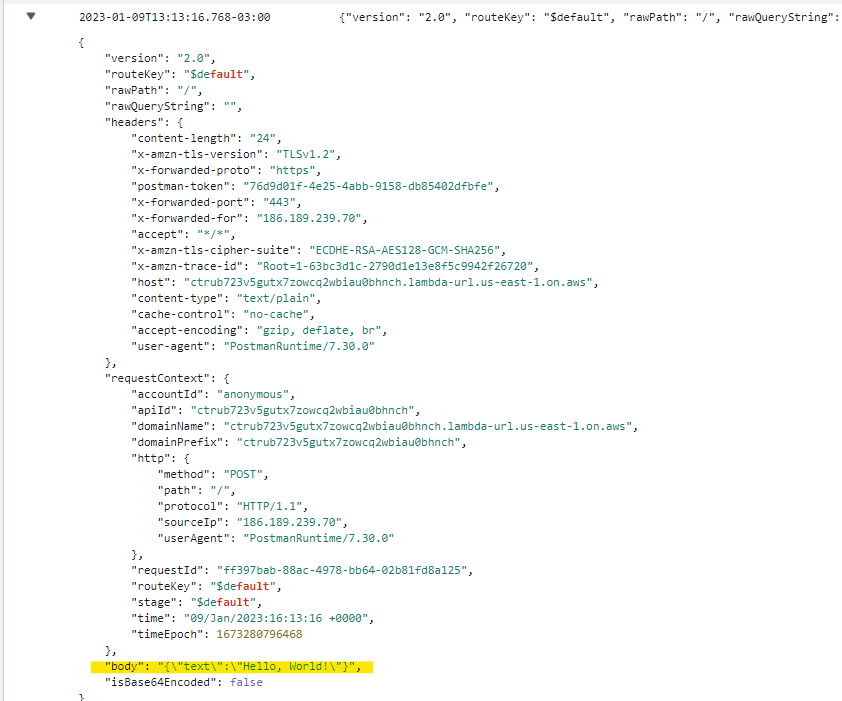
If we open the logs, we can see that the postman call triggered a log with the request’s body.
Later, we’ll use this to check what Autodesk sends us and create a custom message.
Step 3: Create an Autodesk Webhook
Now that we have our bot and lambda function, we’ll create a BIM360/ACC webhook.
You can use any workflow to create a Forge token authentication as long as it has access to your Autodesk Hub and scopes of read and write data. We will not discuss how to create an Autodesk account here, but we’ll share our testing approach to login to Forge APIs.
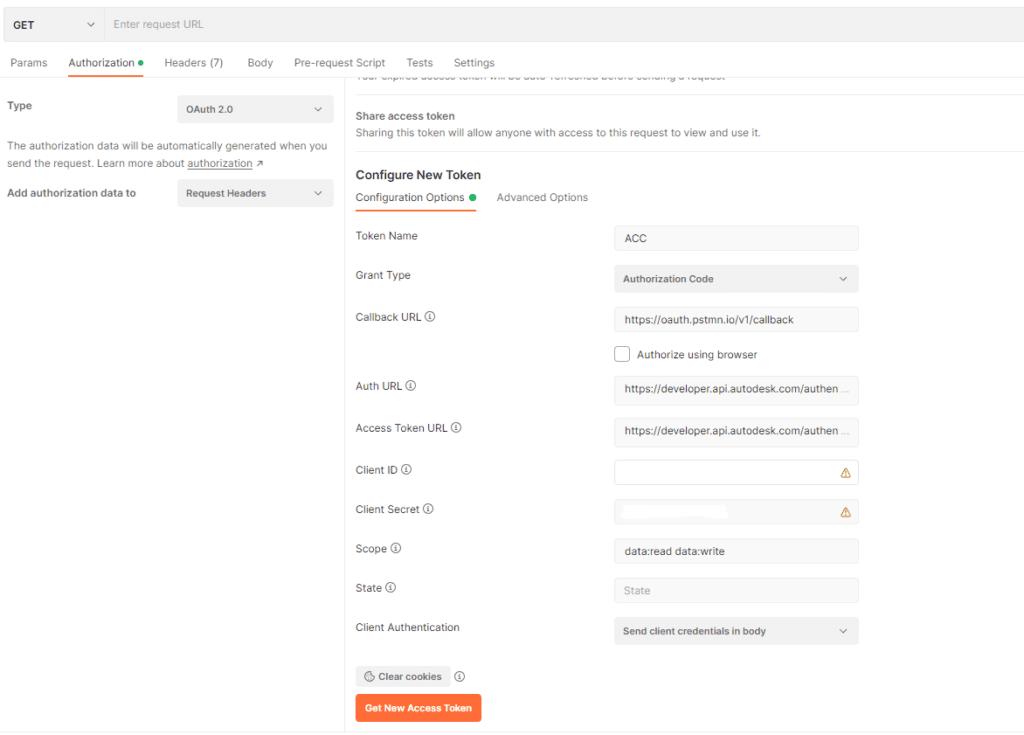
First, in Postman, create a Post request against Forge, click on Authorization and select OAuth 2.0. Fill out the form with the following information:
Token Name: ACC
Callback Url: https://oauth.pstmn.io/v1/callback
Auth URL: https://developer.api.autodesk.com/authentication/v1/authorize
Access Token URL: https://developer.api.autodesk.com/authentication/v1/gettoken
Client ID/ Client Secret: Your Forge application credentials
Scope: data:read data:write
Client Authentication: Send client credentials in the body
It should look like this:
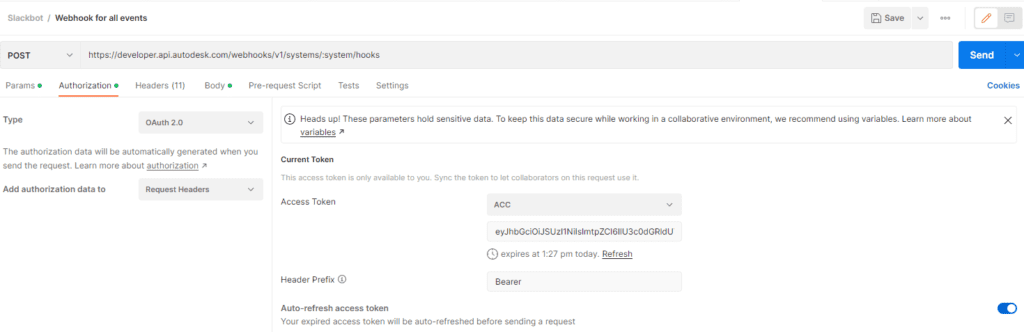
- Clicking on “Get New Access Token” will prompt you to log in with your Autodesk credentials and save the token to your postman.
- On the same page, Go up to Current Token.
- Select the one we just got from Forge. We’ll use it to generate the webhook.
- Set the URL of the request to
https://developer.api.autodesk.com/webhooks/v1/systems/data/hooks, - Go to the body tab, select “Raw”, and “JSON”, and add the following payload.
{"callbackUrl":"yourLambdaUrl","scope":{"folder":"urn:adsk.wipprod:fs.folder:xxxxxx"}}
The folder urn is contained in the folder URL accessible thru the browser. It looks something like this: https://docs.b360.autodesk.com/projects/xxxxxx/folders/**urn:adsk.wipprod:fs.folder:xxxxxx**/detail
You’ll receive a result saying the webhook was created (status 201 created) and a JSON response with all the data from the events that will trigger it.
Test the webhook!
Let’s go to the folder we want to monitor and update something. Once the process of updating is done, go again to your lambda logs to see the payload. We can see the body now shows the information from the hook.
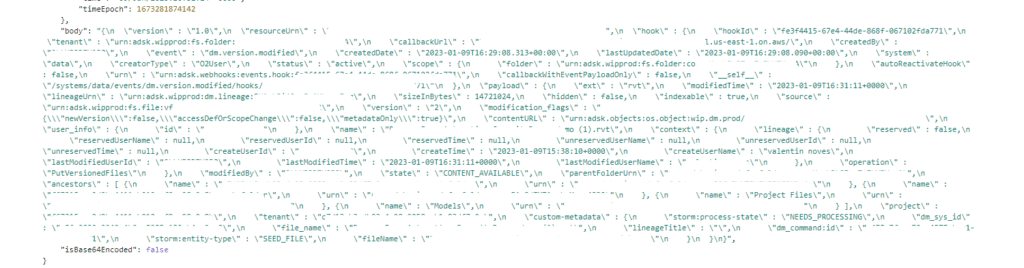
Now we can parse it and just take the information we need.
Step 4: Create a message builder
Here, we modify our AWS lambda function to parse the content of the webhook into something Slack can render on a chat.
For the demo, we’ll track only new versions of files, but feel free to track any event you like.
					import json
import urllib3

http = urllib3.PoolManager()

slackbot_url = "yourslackBotURL"

def lambda_handler(event, context):
    if "body" in event:
        body = json.loads(event["body"])
        print(body)
        event = body["hook"]["event"]
        payload = body["payload"]
        userName = payload["context"]["lineage"]["lastModifiedUserName"]
        if "dm.version.modified" in event:
            filename = payload["name"]
            userName = payload["context"]["lineage"]["lastModifiedUserName"]
            version = payload["version"]
            encoded_body = json.dumps(
                {"text": f"{filename} was updated to version {version} by {userName}."}
            )

            r = http.request(
                "POST",
                slackbot_url,
                headers={"Content-Type": "application/json"},
                body=encoded_body,
            )
    return {"statusCode": 200}
If everything goes well, you should receive a notification informing you that a new version of a file has been posted.

Conclusion
As you can see, the process is simple. Now you can track changes in your project, setup warnings on files, and more directly in to slack chat.
You probably have new ideas on how to implement it, and we’re crazy to hear about them.
If you think something is missing or wrong, please send us your thoughts!

Pablo Derendinger
https://www.e-verse.comI'm an Architect who decided to make his life easier by coding. Curious by nature, I approach challenges armed with lateral thinking and a few humble programming skills. Love to work with passioned people and push the boundaries of the industry. Bring me your problems/Impossible is possible, but it takes more time.