Embed Your ShapeDiver Project in Just Three Steps!
In the dynamic world of the architecture, engineering, and construction (AEC) industry, interactive 3D viewers are transforming how professionals showcase projects and products. By integrating these tools into landing pages and product displays, firms can offer a more immersive and informative experience, allowing clients and stakeholders to explore complex designs and structures with clarity and precision.
Sharing Grasshopper scripts can be a nightmare. With users changing small things here and there keeping the script updated is a difficult task and training every employee on the company on how to use them could be even harder.
Imagine funneling the power of Grasshopper to a controlled environment where you can control how users interact with your script and be hardware agnostic. That’s what we are going to talk about here.
Think about it not only as a technological upgrade; it’s a strategic enhancement to marketing and customer interaction, paving the way for increased competitiveness and innovation.
This interactive capability enhances understanding and engagement and significantly boosts the decision-making process. It allows potential clients to visualize end results in a tangible way, encouraging deeper investment and collaboration.

How to create your cloud app with ShapeDiver
ShapeDiver simplifies the process of sharing customizable design options online. Previously dominated by nerds and 3D specialists, now anyone can integrate an interactive 3D viewer directly into their web pages. This flexibility enhances user engagement by allowing clients to explore and modify your product catalog interactively.

ShapeDiver exposes a great API with lots of information to tweak the look & feel of the viewer to match your needs.
From controlling the 3D objects, and creating animations, to event attaching html elements to the 3D viewer, this has allowed companies to create amazing projects like volumetric building design where users can adjust dimensions and a get estimate square footage and costs in real-time, architectural visualizations that enable clients to change facade materials and floor plans interactively, and even product configurators for industries like automotive and jewelry where users can customize various aspects of their products before purchase.
Example Use Case
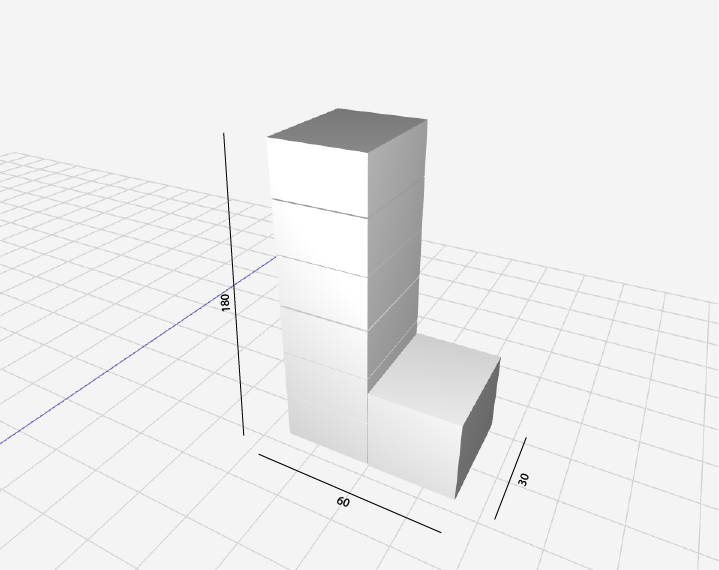
Imagine you work for a real estate company and wish to integrate ShapeDiver’s 3D viewer into your workflow to quickly analyze how many square feet you can build on a specific lot based on the city’s construction code. We could show something like the image below, where the user could adjust the dimensions and amount of floors, be able to design the volumetry of the building and even get the cost from the website.
Let us show you how you can do it with your own ShapeDiver project!
Preparation: Creating and Configuring Your ShapeDiver Model
Before embedding the viewer, ensure you have a ShapeDiver account and have created a model with all necessary parameters and expected outputs defined. This setup is crucial for the interactive features you intend to offer through the viewer.
Step 1: Create your project
A. Set Up Your Development Environment:
- Ensure you have Node.js and npm installed. You can download and install Node.js from nodejs.org. npm is included with Node.js.
B. Create a New Project Directory:
- Open your terminal or command prompt and create a new directory for your project.
					shCopy code
mkdir my-shapeDiver-project
cd my-shapeDiver-project
C. Initialize a New Node.js Project:
- Initialize a new Node.js project by running the following command and following the prompts to set up your
package.jsonfile.
					shCopy code
npm init -y
D. Install ShapeDiver Viewer:
- Install the ShapeDiver viewer using npm.
					shCopy code
npm install --save @shapediver/viewer
E. Set Up Your Project Files:
- Create the necessary project files. Typically, you will need an HTML file to host your viewer, a JavaScript file to initialize and configure the ShapeDiver viewer, and optionally a CSS file for styling.
F. Create an HTML File:
					<!DOCTYPE html>
<html lang="en">
<head>
    <meta charset="UTF-8">
    <meta name="viewport" content="width=device-width, initial-scale=1.0">
    <title>ShapeDiver Viewer Example</title>
    <link rel="stylesheet" href="style.css">
</head>
<body>
    <div id="canvas" style="width: 100%; height: 100vh;"></div> <script src="index.js"></script> </body>
</html>
Step 2: Integrate the Viewer and Session into Your Code
Set up the viewer and session in your website’s backend as follows:
- Viewer: This is the graphical interface where your 3D model will be rendered. It is fully customizable using CSS to fit the design of your webpage.
- Session: This acts as a bridge between your model and the ShapeDiver platform, handling parameters and outputs for model generation.
Here’s how you can implement these components:
					import { createViewport, createSession } from "@shapediver/viewer";

(async () => {

  // create a viewport
  const viewport = await createViewport({
    canvas: document.getElementById("canvas") as HTMLCanvasElement,
    id: "myViewport"
  });

  // create a session
  const session = await createSession({
    ticket:
      "YOUR-TICKET-HERE",
    modelViewUrl: "https://sdeuc1.eu-central-1.shapediver.com",
    id: "mySession"
  });
})();
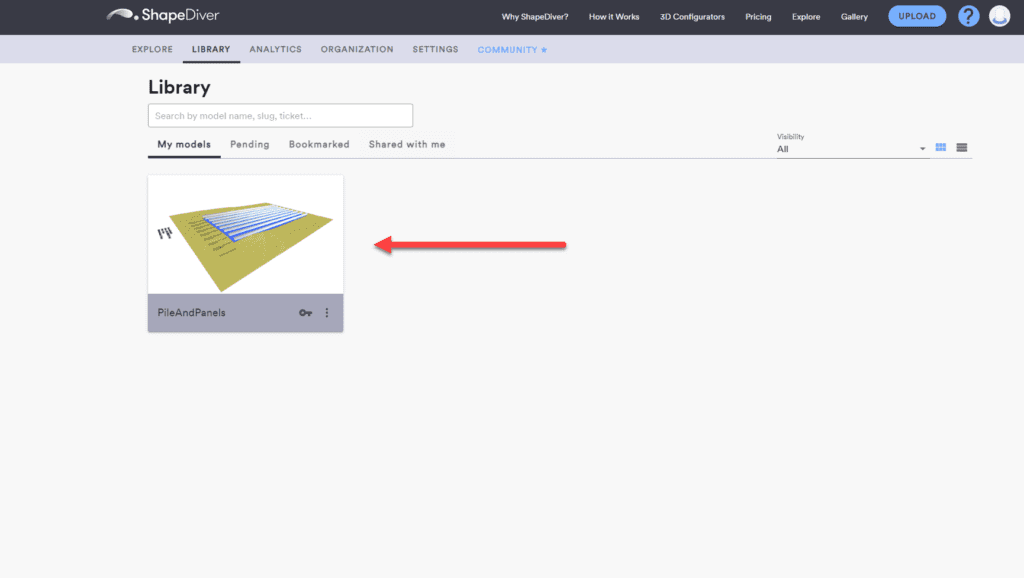
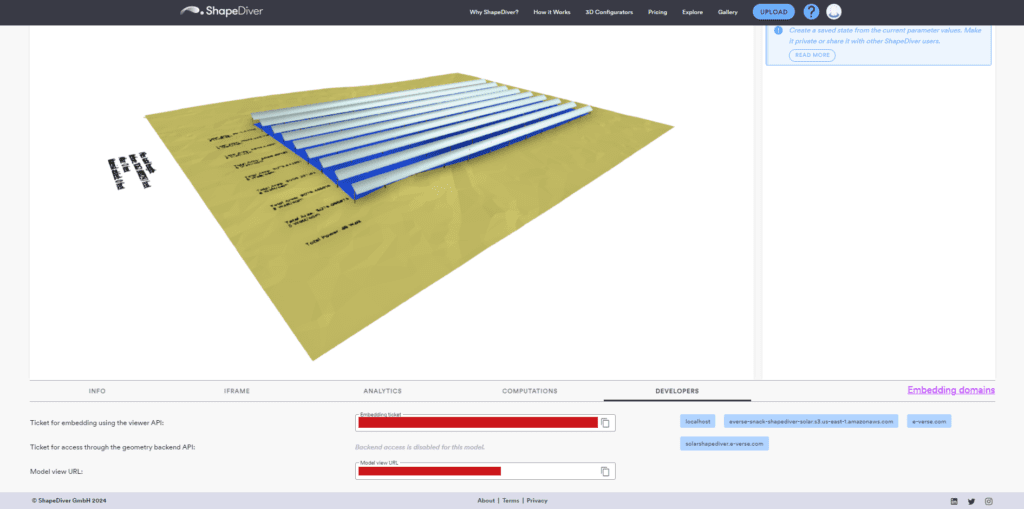
Replace “YOUR-TICKET-HERE” with your unique ticket, which can be found under the Developers tab of your ShapeDiver model.
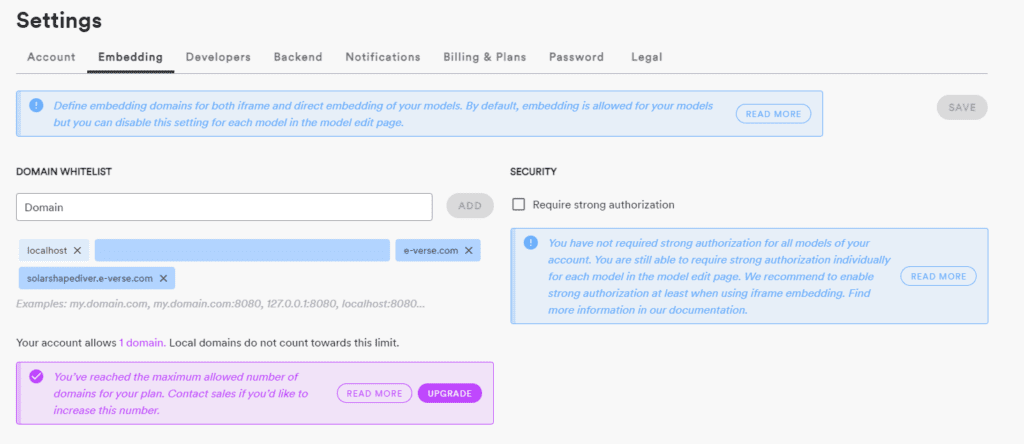
Step 3: Configure Domain Access and Embedding
By filling in all the parameters and embedding the script into your HTML, everything should be settled code-wise, but we still need to allow our domain to access the model.
For security reasons, ShapeDiver requires domain verification to ensure that only authorized websites can access your models. Navigate to the settings menu, select the Embedding option, and add your domain or URL.
How to deploy
Follow the steps below to compile the code, after that you can upload it to the server that you prefer, in our case we used S3 because we wanted to keep the project as an static website.
Update
package.jsonScripts:Open your
package.jsonfile and add a build script:
					jsonCopy code
{
  "name": "my-shapeDiver-project",
  "version": "1.0.0",
  "main": "index.js",
  "license": "MIT",
  "scripts": {
    "build": "parcel build src/index.html --out-dir dist --public-url ./"
  },
  "devDependencies": {
    "parcel-bundler": "^1.12.4"
  },
  "dependencies": {
    "@shapediver/viewer": "^1.0.0"
  }
}
Run the Build Command:
In your project directory, run the following command to compile and bundle your project:
					shCopy code
npm run build
This command uses Parcel to bundle your files and output them to the dist directory.
Final Touches and Visualization
After embedding the viewer and configuring domain settings, customize the viewer’s appearance to align with your brand, such as adjusting colors and controls to enhance user experience.
By following these steps, integrating a ShapeDiver viewer into your website is straightforward and adds significant value by enabling interactive and personalized experiences for your customers.
Conclusion
With this article, we wanted to show how easy is to put together a cloud app almost with no web code knowledge, just with Grasshopper and ShapeDiver. We think this low-entry-level approach might change a lot how things are done in our industry and allow many Architects and Engineers to create their apps easily.

Pablo Derendinger
https://www.e-verse.comI'm an Architect who decided to make his life easier by coding. Curious by nature, I approach challenges armed with lateral thinking and a few humble programming skills. Love to work with passioned people and push the boundaries of the industry. Bring me your problems/Impossible is possible, but it takes more time.